Duna QR Code 函式庫 
一個多功能的 QR code 生成函式庫,支援 HTML、PNG 和 SVG 輸出格式。

總覽 
Duna QR Code 函式庫是一個 QR code 生成工具,最初基於 Duna v8.0 版本之前捆綁的 QrCode 函式庫,由 Laurent Minguet 開發。它以 LGPL 許可證發布,為 QR code 生成提供了一個彈性且開源的解決方案。
安裝 
要安裝此函式庫,請使用 Composer
$ composer require duna/qrcode
用法 
這裡是使用 Duna QR Code 函式庫的快速指南
生成 QR Code 
首先,引入必要的類別並建立一個 QR code 實例
<?php

use Duna\Helpers\QrCode\QrCode;
use Duna\Helpers\QrCode\Output;

$qrCode = new QrCode('Lorem ipsum dolor sit amet');
輸出格式 
PNG 輸出 
要生成 QR code 的 PNG 圖片,指定尺寸和顏色,請使用
// Create PNG output
$output = new Output\Png();

// Generate PNG data with a specified width, background color (white), and foreground color (black)
$data = $output->output($qrCode, 100, [255, 255, 255], [0, 0, 0]);

// Save the PNG data to a file
file_put_contents('file.png', $data);
SVG 輸出 
對於 SVG 輸出,它對於可縮放向量圖形很有用
// Create SVG output
$output = new Output\Svg();

// Generate SVG data with a specified width, background color (white), and foreground color (black)
echo $output->output($qrCode, 100, 'white', 'black');
HTML 輸出 
要將 QR code 顯示為 HTML 表格
// Create HTML output
$output = new Output\Html();

// Generate HTML table representation of the QR code
echo $output->output($qrCode);
許可證 
此函式庫依據 GNU Lesser General Public License (LGPL) v3.0 條款提供。詳情請參閱 LICENSE 檔案。
貢獻 
歡迎貢獻!更多資訊請參閱我們的 CONTRIBUTING 指南。
問題與支援 
如需問題與支援,請參閱我們的 issue 追蹤器 或聯繫社群。
]]>Yii HTML 套件 3.7 版已發布。有一些改進
- 為 CSP 新增了方法
Script::nonce()和Script::getNonce(); - 為
Select標籤新增了枚舉值支援。
Yii Hydrator 套件 1.5 版已發布。以下是新版本中包含的改進列表
- 新增了將值轉換為枚舉的
EnumTypeCaster; - 修正了從父類別填充唯讀屬性的問題。
Yii Validator 套件 2.1 版已發布。以下是新版本中包含的變更列表
- 合併來自 PHP 屬性的規則與透過
getRules()方法提供的規則; - 在
Ip規則中使用Yiisoft\NetworkUtilities\IpRanges:新增getIpRanges()方法並棄用getRanges()、getNetworks()、isAllowed()方法; - 在
IpHandler中使用來自network-utilities套件的NEGATION_CHARACTER常數,而不是宣告自己的常數。
有很多部落格文章展示如何為 yii2 應用程式使用個別登入,但在本文中,我將向您展示如何為所有 YII2 Advanced、YII2 Basic 應用程式使用單一登入畫面,當您的網域在不同伺服器或相同伺服器上時,它也將運作。
以下是您需要遵循以達成此目標的幾個步驟。
1. 對於 Advanced 範本
步驟 1:將此新增到您的元件內部
/path/common/config/main.php
  'components' => [
        'user' => [
            'identityClass' => 'common\models\User',
            'enableAutoLogin' => true,
            'identityCookie' => ['name' => '_identity', 'httpOnly' => true],
        ],
        'request' => [
            'csrfParam' => '_csrf',
        ],
    ],
步驟 2:將 Session 和 Request 新增到 main-local.php
/path/common/config/main-local.php
   'components' => [
        'session' => [
            'cookieParams' => [
                'path' => '/',
                'domain' => ".example.com",
            ],
        ],
        'user' => [
            'identityCookie' => [
                'name' => '_identity',
                'path' => '/',
                'domain' => ".example.com",
            ],
        ],
        'request' => [
            'csrfCookie' => [
                'name' => '_csrf',
                'path' => '/',
                'domain' => ".example.com",
            ],
        ],
    ],
注意:example.com 是主網域。所有其他網域都應該是此網域的子網域。
步驟 3:現在為所有應用程式更新相同的驗證金鑰
/path/frontend/config/main-local.php
/path/backend/config/main-local.php
 'components' => [
        'request' => [
            // !!! insert a secret key in the following (if it is empty) - this is required by cookie validation
            'cookieValidationKey' => 'fFUeb5HDj2P-1a1FTIqya8qOE',
        ],
    ],
注意: 從您的 frontend 和 backend 應用程式的 main.php 中移除 Session 和 request 金鑰。
步驟 4:請注意,您還有主控台應用程式,因此請將 session、user 和 request 更新到您的主控台應用程式的 main-local.php 中
/path/console/config/main-local.php
 'components' => [
        'session' => null,
        'user' => null,
        'request' => null,
    ]
2. 對於 Basic 範本
另外,如果您為另一個專案安裝了 basic 範本,並且您想為該範本使用相同的登入。若要達成此目標,請依照給定的步驟執行
步驟 1:更新您的 basic 範本的 main-local.php
/path/basic-app/config/main-local.php
 'components' => [
        'session' => [
            'cookieParams' => [
                'path' => '/',
                'domain' => ".example.com",
            ],
        ],
        'user' => [
            'identityCookie' => [
                'name' => '_identity',
                'path' => '/',
                'domain' => ".example.com",
            ],
        ],
        'request' => [
            'csrfCookie' => [
                'name' => '_csrf',
                'path' => '/',
                'domain' => ".example.com",
            ],
        ],

    ],
我希望您能充分理解如何為您的所有網域和子網域或儲存庫使用單一登入。
:) 感謝您的閱讀
]]>Yii Swagger 套件 2.1 版已發布。以下是新版本中包含的變更列表
- 新增了對版本
^2.0的psr/http-message的支援。 - 將所需的
yiisoft/yii-view版本提高到^7.1。 - 新增了
\Yiisoft\Swagger\Action\SwaggerJson和\Yiisoft\Swagger\Action\SwaggerUi動作,將\Yiisoft\Swagger\Middleware\SwaggerJson和\Yiisoft\Swagger\Middleware\SwaggerUi類別標記為已棄用(它們將在下一個主要版本中移除)。 - 新增了對版本 5 的
swagger-api/swagger-ui的支援。
Yii Network Utilities 套件 1.2 版已發布。以下是新版本中包含的變更列表
- 為
IpHelper新增了IP_PATTERN和IP_REGEXP常數,用於檢查 IPv4 和 IPv6 版本的 IP。 - 為用於否定範圍的
IpRanges新增了NEGATION_CHARACTER常數。 - 為
IpHelper新增了isIpv4()、isIpv6()、isIp()方法。
Yii Form Model 套件首次發布。它為表單模型提供基礎,並協助填充、驗證和顯示它們。
對於用法,請定義一個表單模型
use Yiisoft\FormModel\Attribute\Safe;
use Yiisoft\FormModel\FormModel;
use Yiisoft\Validator\Rule\Email;
use Yiisoft\Validator\Rule\Length;
use Yiisoft\Validator\Rule\Required;

final class LoginForm extends FormModel
{
    #[Label('Your login')]
    #[Required]
    #[Length(min: 4, max: 40, skipOnEmpty: true)]
    #[Email(skipOnEmpty: true)]
    private ?string $login = null;

    #[Label('Your password')]
    #[Required]
    #[Length(min: 8, skipOnEmpty: true)]
    private ?string $password = null;

    #[Label('Remember me for 1 week')]
    #[Safe]
    private bool $rememberMe = false;
}
使用表單 hydrator 填充資料並進行驗證
use Psr\Http\Message\RequestInterface;
use Yiisoft\FormModel\FormHydrator;
use Yiisoft\FormModel\FormModel;

final class AuthController
{
    public function login(RequestInterface $request, FormHydrator $formHydrator): ResponseInterface
    {
        $formModel = new LoginForm();
        $errors = [];
        if ($formHydrator->populateFromPostAndValidate($formModel, $request)) {
            $errors = $formModel->getValidationResult()->getErrorMessagesIndexedByProperty();
        }

        // You can pass $formModel and $errors to the view now.
    }
}
在視圖中使用欄位顯示它
use Yiisoft\FormModel\Field;
use Yiisoft\FormModel\FormModel;

echo Field::text($formModel, 'login');
echo Field::password($formModel, 'password');
echo Field::checkbox($formModel, 'rememberMe');

// ...
Yii Form 套件首次發布。它提供了一組小工具,以協助動態伺服器端 HTML 表單生成。以下小工具可直接使用
- 輸入欄位:
Checkbox、CheckboxList、Date、DateTimeLocal、Email、File、Hidden、Image、Number、Password、RadioList、Range、Select、Telephone、Text、Textarea、Time、Url; - 按鈕:
Button、ResetButton、SubmitButton; - 群組小工具:
ButtonGroup、Fieldset。 - 其他:
ErrorSummary。
一般用法
use Yiisoft\Form\PureField\Field;

echo Field::text('firstName', theme: 'horizontal')
  ->label('First Name')
  ->autofocus();
echo Field::text('lastName', theme: 'horizontal')
  ->label('Last Name');
echo Field::select('sex')
  ->label('Sex')
  ->optionsData(['m' => 'Male', 'f' => 'Female'])
  ->prompt('—');
echo Field::number('age')
  ->label('Age')
  ->hint('Please enter your age.');
echo Field::submitButton('Submit')
  ->buttonClass('primary');
Yii Hydrator 套件 1.4 版已發布。以下是新版本中包含的改進列表
- 新增了
ToArrayOfStrings參數屬性; - 為
Collection新增了枚舉值支援。
Yii HTML 套件 3.6 版已發布。有一些改進和修正
- 當屬性名稱為空或包含禁止的符號時,在
Html::renderAttribute()中拋出InvalidArgumentException。 - 為 textarea 標籤新增了 Stringable 和陣列值支援。
- 為
CheckboxList和RadioList小工具新增了枚舉值支援。 - 修正了
Html::renderTagAttributes()中null值屬性的輸出。
Yii Auth JWT 套件 2.1 版已發布。以下是新版本中包含的變更列表
- 將依賴項中的多個
web-token/*套件替換為一個 -web-token/jwt-library,將 PHP 的最低版本更新為 8.1。 - 新增了對版本
^2.0的psr/http-message的支援。
Yii Hydrator 套件 1.3 版已發布。以下是新版本中包含的改進列表
- 新增了透過
CollectionPHP 屬性對集合的支援; - 為
ParameterAttributesHandler新增了 hydrator 依賴項和withHydrator()方法。 - 為
ParameterAttributeResolveContext新增了 hydrator 依賴項和getHydrator()方法。 - 允許對未初始化的
readonly屬性進行 hydration。
Yii Network Utilities 套件 1.1 版已發布。有一些改進
- 新增了表示允許或禁止的 IP 範圍集合的
IpRanges; - 修正了在 PHP 8.0+ 中將 IP 位址轉換為位元表示時的錯誤。
Yii Validator 的主要版本已標記。
- 新增了
Each::PARAMETER_EACH_KEY驗證上下文參數,該參數在Each規則處理期間可用,並包含目前金鑰 - 當錯誤訊息中存在屬性名稱時,包含屬性名稱
- 新增 PHP 屬性,用於設定錯誤訊息中使用的屬性標籤
- 新增
InEnum規則 - 在類別/特徵/方法/變數/預留位置名稱中將 "attribute" 變更為 "property"
- 將
Error::getValuePath()中的$escape參數類型從bool|string|null變更為string|null - 在
OneOf和AtLeast規則的錯誤訊息中列出已翻譯的屬性 - 修正
OneOf規則中錯誤訊息的含義 - 改進
OneOf和AtLeast規則的錯誤訊息的含義並使用複數形式 - 不允許
AtLeast配置中的$min大於$attributes的數量 - 將
getName()方法從RuleInterface移動到RuleWithOptionsInterface - 將
RuleWithOptionsInterface重新命名為DumpedRuleInterface - 在使用
RulesDumper匯出期間,將 FQCN 用作內建規則的名稱 - 在使用
RulesDumper匯出期間,將 FQCN 用作未實作DumpedRuleInterface的規則的名稱 - 將規則建構函式中
$skipOnEmpty參數的類型從mixed變更為bool|callable|null - 將
RuleHandlerInterface::validate()中$rule參數的類型從object變更為RuleInterface - 將
AtLeast規則重新命名為FilledAtLeast,將OneOf規則重新命名為FilledOnlyOneOf - 為與不正確輸入相關的錯誤訊息新增類型
- 如果程式碼在 PHP 8.3 中執行,則在
JsonHandler中使用內建 PHP 函數json_validate() - 改進
Result類別中的 psalm 註解 - 新增德語翻譯
- 對於 PHP 8.3 以下的版本,在使用內建 PHP 函數的
JsonHandler中簡化 JSON 的驗證 - 將 PHP 的最低版本提高到 8.1
- 重構
Result::add():從foreach中取出array_merge() - 使
RulesNormalizer::normalize()中的參數$rules成為可選 - 使
Json::$message更清楚一點 - 修正
Nested規則中規則的錯誤訊息中的屬性名稱用法 - 資料物件 PHP 屬性提供的規則未在
RulesNormalizer::normalize()中使用 - 修正
Each::$incorrectInputKeyMessage的type參數的錯誤值
請參閱 升級說明,其中包含關於將套件升級到此主要版本的注意事項。
]]>我們很高興宣布 Yii 框架 2.0.51 版的發布。
請參閱 https://yii.dev.org.tw/download/ 上的說明,以安裝或升級到此版本。
此版本修正了 2.0.50 中的回歸、錯誤處理常式與 PHP 8.3 的相容性以及一些錯誤。
感謝所有為框架做出貢獻的 Yii 社群成員、保持文件翻譯更新的翻譯人員以及在論壇上回答問題的社群成員。
有許多活躍的 Yii 社群,因此如果您需要協助或想要分享您的經驗,請隨時加入他們。
完整的變更列表可以在 CHANGELOG 中找到。
]]>Yii 2 上的 Ping CRM 
一個 Yii 2 demo 應用程式,用於說明 Inertia.js 如何運作。
使用 Inertia,您可以使用經典的伺服器端路由和控制器來建置單頁應用程式,而無需建置 API。
此應用程式是原始 Ping CRM (以 Laravel 編寫) 的移植版本,並基於 Yii 2 Basic Project Template。

基於 Yii 2 上的 Ping CRM 應用程式 github 和 yii 擴充套件。
變更:將 Vue 更新到版本 3,更新了 npm 套件和 composer。將 Vue 檔案轉換為 Composition API (script setup)。
Demo 
安裝 
在本機複製 repo
git clone https://github.com/toatall/pingcrm-yii2-vue3 pingcrm-yii2-vue3
cd pingcrm-yii2-vue3
安裝 PHP 依賴項
composer install
安裝 NPM 依賴項
npm ci
建置 assets
npm run css-dev
npm run dev
建立 SQLite 資料庫。您也可以使用另一個資料庫 (MySQL、Postgres),只需相應地更新您的配置即可。
touch database/database.sqlite
執行資料庫遷移
php yii migrate
執行資料庫 seeder
php yii db/seed
執行開發伺服器 (輸出將提供位址)
php yii serve
您已準備就緒!在您的瀏覽器中造訪 Ping CRM,並使用以下資訊登入
- 使用者名稱: johndoe@example.com
- 密碼: secret
執行測試 
要執行 Ping CRM 測試,請執行
(to be done)
需求 
- PHP >=7.4.0
- Node.js & NPM
- SQLite
擴展此專案 
使用新功能擴展此專案時,需要執行以下步驟。
在後端 
- 新增新的控制器,它從 inertia 控制器擴展而來
- 新增一個或多個動作
- 從動作傳回,並呼叫 inertia render 方法
<?php

namespace app\controllers;

use tebe\inertia\web\Controller;

class CustomController extends Controller
{
    public function actionIndex()
    {
        $params = [
            'data' => [],
        ];
        return $this->inertia('demo/index', $params);
    }
}
您可以在 https://github.com/tbreuss/yii2-inertia 找到更多資訊。
在前端 
- 在
resources/js/Pages下為您在後端新增的每個控制器動作新增一個新頁面 - 複製 & 貼上現有的頁面範例之一
- 根據需要實作和/或擴展 Vue.js stuff
- 使用此處和 package.json 中描述的前端工具
您可以在 https://inertia.dev.org.tw 找到更多資訊。
致謝 
- 原始工作由 Jonathan Reinink (@reinink) 和貢獻者完成
- 移植到 Yii 2 由 Thomas Breuss (@tbreuss) 完成
- 由 @toatall 修改 (https://github.com/toatall)
Yii HTTP Runner 的主要版本已標記。在此版本中進行了一些變更。
- 新增了變更緩衝區大小以傳送訊息本文內容的功能。
- 允許使用任何 PSR logger,預設為
NullLogger。 - 移除了
ServerRequestFactory。 - 將
SapiEmitter標記為內部。 - 修正了不關閉自身輸出緩衝區的錯誤處理回應。
Yii Error Handler 套件已更新,包含以下增強功能
- 新增複製 cURL 按鈕、排序請求標頭、修正 UI;
- 簡化錯誤日誌;
- 點擊顯示完整參數;
- 移除
@anonymous後綴; - 點擊顯示參數表格;
- 停止在文字選取上的點擊事件;
- 在所有關機函數之後執行
exit(1),即使是延後的函數也是如此。
Yii HTML 套件 3.5 版已發布。有一些改進
- 為標籤
hr新增了類別和方法Html::hr(); - 為
aria-describedby屬性新增了對多個元素的支援。
Yii Logging Library 套件已更新,包含以下增強功能和新功能
- 新增了新的靜態方法
Logger::assertLevelIsValid()、Logger::assertLevelIsString()和Logger::assertLevelIsSupported(); - 新增了對訊息範本變數中巢狀值的支援,例如
{foo.bar}; - 新增了上下文提供者;
- 新增了
DateTime和DateTimeImmutable作為日誌上下文中的時間的支援; - 新增了
Message::category()方法和Message::DEFAULT_CATEGORY常數,棄用CategoryFilter::DEFAULT以支持它; - 新增了
Message::trace()方法; - 新增了
Message::time()方法; - 棄用了方法
Logger::validateLevel(); - 棄用了
Logger方法setTraceLevel()和setExcludedTracePaths(),以支持上下文提供者的使用; - 棄用了
Target類別中的方法setCommonContext()和getCommonContext(); - 在例外訊息生成中將
gettype()替換為get_debug_type(); - 將
Message建構函式中$level參數的類型變更為string; - 修正了解析包含無法轉換為字串的變數的訊息時的錯誤;
- 修正了當追蹤不包含 "file" 和 "line" 時格式化追蹤的錯誤。
Yii Mailer Library 的次要版本已標記。有一些改進和修正
- 允許在
MessageFactory中設定預設 "from" 值; - 將最低 PHP 版本提高到
^8.1; - 將所需的
yiisoft/view版本提高到^10.0。
Yii View Renderer 的次要版本已標記。
- 將所需的
yiisoft/view版本提高到^10.0。
yii2-random-provider 
具有隨機選擇的 ActiveDataProvider 


RandomProvider 衍生自 ActiveDataProvider,屬於 Yii 2.0 PHP 框架。它以隨機方式選擇記錄,在某些情況下,這可能比常規 ActiveDataProvider (通常) 的有序方式更具吸引力。RandomProvider 旨在與我的 LoadMorePager 協作,但它也適用於 LinkPager 或其他分頁器。
請注意,RandomProvider 不支援 CUBRID 或 dblib 資料庫驅動程式。此外,我僅使用 mysql 進行了測試。我很確定它也適用於其他驅動程式。如果您有任何經驗可以分享,我將不勝感激。
另請注意,RandomProvider 使用名為 'Order By Rand()' 的演算法。這相當慢,並且擴展性不佳。因此,建議僅在相對較小的資料集 (考慮少於幾千條記錄) 中使用 RandomProvider。更多資訊請參閱 這裡。
RandomProvider 的示範 在這裡。
安裝 
以通常的方式使用 Composer 安裝 yii2-random-provider。將以下內容新增到您的 composer.json 檔案的 require 區段
"sjaakp/yii2-random-provider": "*"
或執行
composer require sjaakp/yii2-random-provider
您可以透過 以 ZIP 格式下載來源 手動安裝 yii2-random-provider。
使用 RandomProvider 
RandomProvider 是 Yii 的 ActiveDataProvider 的直接替換。像使用 ActiveDataProvider 一樣使用它即可。
]]>

Yii 2 Debug For MongoDB
本專案為 yii2-debug 的擴展,使用 MongoDB 對 debug 數據進行存儲。
目錄結構 
  src/                 代码目录
  src/models/          数据模型
  src/views/           视图文件
  src/controllers/     控制器
安裝依賴 
- PHP 支援 >=5.4
- yii2-mongodb
- yii2-debug 支援 >=2.1.25 (基於此版本構建而來)
安裝說明 
composer require yagas/yii2-debug4mongo
配置說明 
if (YII_ENV_DEV) {
    $config['bootstrap'][] = 'debug';
    $config['modules']['debug'] = [
        'class' => 'yagas\debug\Module',
        'logTarget' => [
            'class' => 'yagas\debug\LogTarget',
            'app_no' => 'localhost_001', // 为当前站点设定标识
        ],
        'percent' => 10, // 百分之十的几率清除历史数据(GC)
    ];
}
Yii2 PDF.js 
使用 PDF.js 預覽 Yii2 的 PDF 檔案


Yii2 PDF.js 使用 PDF.js
Demo: https://mozilla.github.io/pdf.js/web/viewer.html
目錄 
安裝 
套件可在 Packagist 上取得,您可以使用 Composer 安裝它。
composer require diecoding/yii2-pdfjs '^1.0'
或新增到您的 composer.json 檔案的 require 區段。
'diecoding/yii2-pdfjs': '^1.0'
依賴項 
- PHP 7.2+
- yiisoft/yii2
用法 
設定模組 
...
'modules'=>[
  'pdfjs' => [
       'class' => \diecoding\pdfjs\Module::class,
   ],
],
...
視圖 
基本用法 
echo \diecoding\pdfjs\PdfJs::widget([
    'url' => '@web/uploads/dummy.pdf',
]);
具有完整工具列區段的直接網址 
echo Url::to(["/pdfjs", 'file' => Url::to('@web/uploads/dummy.pdf', true)], true);
自訂屬性 
echo \diecoding\pdfjs\PdfJs::widget([
    'url' => '@web/uploads/dummy.pdf',
    'options' => [
        'style' => [
            'width' => '100%',
            'height' => '500px',
        ],
    ],
]);
停用工具列區段 
echo \diecoding\pdfjs\PdfJs::widget([
    'url' => '@web/uploads/dummy.pdf',
    'sections' => [
        'toolbarContainer' => false,
    ],
]);
rabbitmq 佇列 消息佇列 
專案位址:https://github.com/2723659854/rabbitmq 
專案介紹 
消息佇列主要用於業務解耦,本專案採用 rabbitmq,支援 thinkPHP、laravel、webman、yii 等常用框架,也可以單獨使用。
安裝方法 install 
composer require xiaosongshu/rabbitmq
範例 demo 
定義一個佇列 queue 
<?php
namespace app\commands;

require_once __DIR__.'/vendor/autoload.php';

class Demo extends \Xiaosongshu\Rabbitmq\Client
{

    /** 以下是rabbitmq配置 ,请填写您自己的配置 */
    /** @var string $host 服务器地址 */
    public static $host = "127.0.0.1";

    /** @var int $port 服务器端口 */
    public static $port = 5672;

    /** @var string $user 服务器登陆用户 */
    public static $user = "guest";

    /** @var string $pass 服务器登陆密码 */
    public static $pass = "guest";

    /**
     * 业务处理
     * @param array $params
     * @return int
     */
    public static function handle(array $params): int
    {
        //TODO 这里写你的业务逻辑
        // ...
        var_dump($params);
        return self::ACK;
        //return self::NACK;
    }
}
投遞消息 publish 
\app\commands\Demo::publish(['name'=>'tome','age'=>15]);
你可以在任何地方投遞消息。
開啟消費 
\app\commands\Demo::consume();
你可以把消費者放到 command 命令列裡面,使用命令列執行佇列消費。舉個例子(這裡以 yii 為例子,你也可以換成 laravel、webman、thinkPHP 等其他框架): `php <?php
namespace app\commands;
use yii\console\Controller;
/**
- @purpose 開啟佇列消費
@note 我只是一個例子 */ class QueueController extends Controller {
/**
- @api php yii queue/index
- @return void
- @throws \Exception
- @comment 開啟消費者 */ public function actionIndex() { Demo::consume(); } }
开启消费者命令 consume
```bash
php yii queue/index
注:如果你需要開啟多個消費者,那麼可以在多個視窗執行開啟消費者命令即可。當然你也可以使用多進程來處理。
關閉消費者 
\app\commands\Demo::close();
異常 Exception 
佇列使用過程中請使用 \RuntimeException 和 \Exception 捕獲異常
若需要使用延遲佇列,那麼 rabbitmq 服務需要安裝延遲外掛程式,否則會報錯 
測試 
本專案根目錄有一個 demo.php 的測試檔案,可以複製到你的專案根目錄,在命令列視窗直接在命令列執行以下命令即可。 `php php demo.php 測試檔案程式碼如下:php <?php
namespace xiaosongshu\test; require_once DIR . '/vendor/autoload.php';
/**
- demo
@purpose 定義一個佇列演示 */ class Demo extends \Xiaosongshu\Rabbitmq\Client {
/* 以下是 rabbitmq 配置 ,請填寫您自己的配置 / /* @var string $host 伺服器位址 / public static $host = "127.0.0.1";
/* @var int $port 伺服器埠 / public static $port = 5672;
/* @var string $user 伺服器登入用戶 / public static $user = "guest";
/* @var string $pass 伺服器登入密碼 / public static $pass = "guest";
/**
- 業務處理
- @param array $params
- @return int */ public static function handle(array $params): int { //TODO 這裡寫你的業務邏輯 // ... var_dump($params); /* 成功,返回 ack / return self::ACK; /* 失敗,返回 NACK/ //return self::NACK; } }
/ 投遞普通消息 */ \xiaosongshu\test\Demo::publish(['name' => 'tom']); \xiaosongshu\test\Demo::publish(['name' => 'jim']); \xiaosongshu\test\Demo::publish(['name' => 'jack']); /* 開啟消費,本函數為阻塞,後面的程式碼不會執行 / \xiaosongshu\test\Demo::consume(); / 關閉消費者 */ \xiaosongshu\test\Demo::close(); `
聯絡作者:2723659854@qq.com ,你也可以直接提issues 
]]>rabbitmq 佇列 延遲佇列 
安裝方法 install 
composer require xiaosongshu/yii2-rabbitmq
範例 demo 
定義一個佇列 queue 
<?php
namespace app\commands;

require_once __DIR__.'/vendor/autoload.php';

class Demo extends \Xiaosongshu\Rabbitmq\Client
{

    /** 以下是rabbitmq配置 ,请填写您自己的配置 */
    /** @var string $host 服务器地址 */
    public static $host = "127.0.0.1";

    /** @var int $port 服务器端口 */
    public static $port = 5672;

    /** @var string $user 服务器登陆用户 */
    public static $user = "guest";

    /** @var string $pass 服务器登陆密码 */
    public static $pass = "guest";

    /**
     * 业务处理
     * @param array $params
     * @return int
     */
    public static function handle(array $params): int
    {
        //TODO 这里写你的业务逻辑
        // ...
        var_dump($params);
        return self::ACK;
        //return self::NACK;
    }
}
投遞消息 publish 
\app\commands\Demo::publish(['name'=>'tome','age'=>15]);
你可以在任何地方投遞消息。
開啟消費 
\app\commands\Demo::consume();
你可以把消費者放到 command 命令列裡面,使用命令列執行佇列消費。舉個例子: `php <?php
namespace app\commands;
use yii\console\Controller;
/**
- @purpose 開啟佇列消費
@note 我只是一個例子 */ class QueueController extends Controller {
/**
- @api php yii queue/index
- @return void
- @throws \Exception
- @comment 開啟消費者 */ public function actionIndex() { Demo::consume(); } }
开启消费者命令 consume
```bash
php yii queue/index
異常 Exception 
佇列使用過程中請使用 \RuntimeException 和 \Exception 捕獲異常
若需要使用延遲佇列,那麼 rabbitmq 服務需要安裝延遲外掛程式,否則會報錯 
聯絡作者:2723659854@qq.com 
]]>elasticsearch-YII 客戶端 elasticsearch client for YII 
安裝 install 
composer require xiaosongshu/yii2-elasticsearch
配置 Configuration 
`php
'components' => [
 'ESClient' => [
        'class' => \Xiaosongshu\Elasticsearch\ESClient::class,
        'node'=>['192.168.101.170:9200'],
        'username' => '',
        'password' => '',
    ],
]
`
基本用法範例 
$res = Yii::$app->ESClient->search('index','_doc','title','测试')['hits']['hits'];
用戶端支援的所有方法 
创建索引:createIndex
创建表结构:createMappings
删除索引:deleteIndex
获取索引详情:getIndex
新增一行数据:create
批量写入数据:insert
根据id批量删除数据:deleteMultipleByIds
根据Id 删除一条记录:deleteById
获取表结构:getMap
根据id查询数据:find
根据某一个关键字搜索:search
使用原生方式查询es的数据:nativeQuerySearch
多个字段并列查询,多个字段同时满足需要查询的值:andSearch
or查询  多字段或者查询:orSearch
根据条件删除数据:deleteByQuery
根据权重查询:searchByRank
获取所有数据:all
添加脚本:addScript
获取脚本:getScript
使用脚本查询:searchByScript
使用脚本更新文档:updateByScript
索引是否存在:IndexExists
根据id更新数据:updateById
如果單獨使用本插件,則需要在實例化的時候傳入 elasticsearch 的連線配置 
elasticsearch 用戶端使用實例 
<?php
require_once 'vendor/autoload.php';

/** 实例化客户端 */
$client = new \Xiaosongshu\Elasticsearch\ESClient([
    /** 节点列表 */
    'nodes' => ['192.168.4.128:9200'],
    /** 用户名 */
    'username' => '',
    /** 密码 */
    'password' => '',
]);
/** 删除索引 */
$client->deleteIndex('index');
/** 如果不存在index索引,则创建index索引 */
if (!$client->IndexExists('index')) {
    /** 创建索引 */
    $client->createIndex('index', '_doc');
}

/** 创建表 */
$result = $client->createMappings('index', '_doc', [
    'id' => ['type' => 'long',],
    'title' => ['type' => 'text', "fielddata" => true,],
    'content' => ['type' => 'text', 'fielddata' => true],
    'create_time' => ['type' => 'text'],
    'test_a' => ["type" => "rank_feature"],
    'test_b' => ["type" => "rank_feature", "positive_score_impact" => false],
    'test_c' => ["type" => "rank_feature"],
]);
/** 获取数据库所有数据 */
$result = $client->all('index','_doc',0,15);

/** 写入单条数据 */
$result = $client->create('index', '_doc', [
    'id' => rand(1,99999),
    'title' => '我只是一个测试呢',
    'content' => '123456789',
    'create_time' => date('Y-m-d H:i:s'),
    'test_a' => 1,
    'test_b' => 2,
    'test_c' => 3,
]);
/** 批量写入数据 */
$result = $client->insert('index','_doc',[
    [
        'id' => rand(1,99999),
        'title' => '我只是一个测试呢',
        'content' => '你说什么',
        'create_time' => date('Y-m-d H:i:s'),
        'test_a' => rand(1,10),
        'test_b' => rand(1,10),
        'test_c' => rand(1,10),
    ],
    [
        'id' => rand(1,99999),
        'title' => '我只是一个测试呢',
        'content' => '你说什么',
        'create_time' => date('Y-m-d H:i:s'),
        'test_a' => rand(1,10),
        'test_b' => rand(1,10),
        'test_c' => rand(1,10),
    ],
    [
        'id' => rand(1,99999),
        'title' => '我只是一个测试呢',
        'content' => '你说什么',
        'create_time' => date('Y-m-d H:i:s'),
        'test_a' => rand(1,10),
        'test_b' => rand(1,10),
        'test_c' => rand(1,10),
    ],
]);
/** 使用关键字搜索 */
$result = $client->search('index','_doc','title','测试')['hits']['hits'];

/** 使用id更新数据 */
$result1 = $client->updateById('index','_doc',$result[0]['_id'],['content'=>'今天你测试了吗']);
/** 使用id 删除数据 */
$result = $client->deleteById('index','_doc',$result[0]['_id']);
/** 使用条件删除 */
$client->deleteByQuery('index','_doc','title','测试');
/** 使用关键字搜索 */
$result = $client->search('index','_doc','title','测试')['hits']['hits'];
/** 使用条件更新 */
$result = $client->updateByQuery('index','_doc','title','测试',['content'=>'哇了个哇,这么大的种子,这么大的花']);
/** 添加脚本 */
$result = $client->addScript('update_content',"doc['content'].value+'_'+'谁不说按家乡好'");
/** 添加脚本 */
$result = $client->addScript('update_content2',"(doc['content'].value)+'_'+'abcdefg'");
/** 获取脚本内容 */
$result = $client->getScript('update_content');
/** 使用脚本搜索 */
$result = $client->searchByScript('index', '_doc', 'update_content', 'title', '测试');
/** 删除脚本*/
$result = $client->deleteScript('update_content2');
/** 使用id查询 */
$result = $client->find('index','_doc','7fitkYkBktWURd5Uqckg');
/** 原生查询 */
$result = $client->nativeQuerySearch('index',[
    'query'=>[
        'bool'=>[
            'must'=>[
                [
                    'match_phrase'=>[
                        'title'=>'测试'
                    ],
                ],
                [
                    'script'=>[
                        'script'=>"doc['content'].value.length()>2"
                    ]
                ]
            ]
        ]
    ]

]);
/** and并且查询 */
$result = $client->andSearch('index','_doc',['title','content'],'测试');
/** or或者查询 */
$result = $client->orSearch('index','_doc',['title','content'],'今天');
測試 
將本擴充套件的 phpunit.xml 檔案複製到專案的根目錄下面,然後執行下面的命令 `bash php ./vendor/bin/phpunit -c phpunit.xml `
聯絡作者 
2723659854@qq.com
]]>$config['components']['mailer'] = [
'class' => 'jatin\resend\Mailer',
'useFileTransport' => false,
'viewPath' => '@app/mail',
'transport' => [
    'apiKey' => '<YOUR_API_KEY>'
],
];
]]>
HTTP Proxy Extension for Yii 2
這是一個 Yii2 框架的簡單代理。此擴充套件為 Yii framework 2.0 提供了 HTTP 代理動作。
有關許可證資訊,請查看 LICENSE 檔案。
![]()
![]()


安裝 
composer require asminog/yii2-proxy
用法 
use asminog\proxy\ProxyAction;

class SiteController extends Controller
{
    public function actions()
    {
        return [
            'proxy' => [
                'class' => ProxyAction::class,
                // 'accessToken' => 'your-access-token', // - set access token for secure requests
                // 'throw404Exception' => true, // - show 404 error if access token is not valid or request url is not valid
                // 'proxyHeaders' => ['User-Agent', 'Content-Type'], // - set headers for proxy request
                // 'proxyCookies' => ['cookie1', 'cookie2'], // - set cookies for proxy request
            ],
        ];
    }
}
yii2-flatpickr 
]]>yii2-form-wizard 
一個用於 bootstrap 5 的 Yii2 form-wizard 小工具

功能 
- Bootstrap 5
- 用戶端驗證,可選擇單獨驗證每個步驟
安裝 
安裝此擴充套件的首選方法是透過 composer。
執行以下命令
php composer.phar require --prefer-dist sandritsch91/yii2-form-wizard
或新增
"sandritsch91/yii2-form-wizard": "*"
到您的 composer.json 的 require 區段
用法 
use sandritsch91\yii2-form-wizard\FormWizard;

echo FormWizard::widget([
    // required
    'model' => $model,                                                          // The model to be used in the form
    'tabOptions' => [                                                           // These are the options for the Bootstrap Tab widget
        'items' => [
            [
                'label' => 'Step 1',                                            // The label of the tab, if omitted, a default-label will be used (Step 1, Step 2, ...)
                'content' => $this->render('_step1', ['model' => $model]),      // Either the content of the tab
            ],
            [
                'label' => 'Step 2',
                'view' => '/test/_step2',                                       // or a view to be rendered. $model and $form are passed to the view
                'params' => ['a' => 1, 'b' => 2]                                // Pass additional parameters to the view
            ]
        ],
        'navType' => 'nav-pills'
    ],
    // optional
    'validateSteps' => [                                                        // Optional, pass the fields to be validated for each step.
        ['name', 'surname'],
        [],                                                                     // Leave array empty if no validation is needed
        ['email', 'password']
    ],
    'options' => [],                                                            // Wizard-container html options
    'formOptions' => [],                                                        // Form html options
    'buttonOptions' => [                                                        // Button html options
        'previous' => [
            'class' => ['btn', 'btn-secondary'],
            'data' => [
                'formwizard' => 'previous'                                      // If you change this, make sure the clientOptions match
            ]
        ],
        'next' => [...],
        'finish' => [...]
    ],
    'clientOptions' => [                                                        // Client options for the form wizard, if you need to change them
        // 'finishSelector' => '...',
        // 'nextSelector' => '...',
        // 'previousSelector' => '...',
        // 'keepPosition' => true                                               // Keep scroll position on step change.
                                                                                // Set to false to disable, or pass a selector if you have a custom scroll container.
                                                                                // Defaults to true.
    ],
    'clientEvents' => [                                                         // Client events for the form wizard
        // 'onNext' => 'function () {...}',
        // 'onPrevious' => 'function () {...}',
        // 'onFinish' => 'function (){...}'
    ]
]);
貢獻 
歡迎貢獻。
如果您有任何問題、想法、建議或錯誤,請開啟一個 issue。
測試 
此套件使用 codeception 進行測試。要執行測試,請執行以下命令
#### Unit tests

run ```php.exe .\vendor\bin\codecept run Unit``` in the root directory of this repository.

#### Functional tests

run ```php.exe .\vendor\bin\codecept run Functional``` in the root directory of this repository.

#### Accpetance tests

To be able to run acceptance tests, a few requirements are needed:

For Windows:\

- install java runtime environment
- install nodejs
- install selenium-standalone: `npm install -g selenium-standalone`
- start selenium-standalone: `selenium-standalone install && selenium-standalone start`
- host a yii2 application on a server or locally via ```./yii serve```
    - add this plugin as a dependency to your ```composer.json``` and update dependencies
    - site must be reachable over http://formwizard.com/
    - add an action ```actionTest``` to the ```SiteController```, as described below
    - this action must return a view file, as described below
    - run ```php.exe .\vendor\bin\codecept run Acceptance```

For Linux:
Never did that before, but I think it is similar to the Windows setup.

The action in the SiteController:

```php
public function actionTest(): string
{
    include __DIR__ . '/../vendor/sandritsch91/yii2-widget-form-wizard/tests/Support/Data/models/User.php';

    $model = new User();

    if (Yii::$app->request->post() && $model->load(Yii::$app->request->post()) && $model->validate()) {
        return 'success';
    }

    return $this->render('test', [
        'model' => new User()
    ]);
}
```

The view returned by the action:

```php
/** @var User $model */

use sandritsch91\yii2\formwizard\FormWizard;
use sandritsch91\yii2\formwizard\tests\Support\Data\models\User;

$wizard = FormWizard::widget([
    'model' => $model,
    'tabOptions' => [
        'options' => [
            'class' => 'mb-3'
        ],
        'items' => [
            [
                'label' => 'Step 1',
                'view' => '@app/vendor/sandritsch91/yii2-widget-form-wizard/tests/Support/Data/views/site/step1',
                'linkOptions' => [
                    'id' => 'step1-link',,
                    'params' => [
                        'test' => 'some test variable'
                    ]
                ]
            ],
            [
                'label' => 'Step 2',
                'view' => '@app/vendor/sandritsch91/yii2-widget-form-wizard/tests/Support/Data/views/site/step2',
                'linkOptions' => [
                    'id' => 'step2-link',
                ]
            ],
            [
                'label' => 'Step 3',
                'view' => '@app/vendor/sandritsch91/yii2-widget-form-wizard/tests/Support/Data/views/site/step3',
                'linkOptions' => [
                    'id' => 'step3-link',
                ]
            ]
        ],
        'navType' => 'nav-pills'
    ],
    'validateSteps' => [
        ['firstname', 'lastname'],
        ['username', 'password', 'password_validate'],
        ['email']
    ],
    'clientOptions' => [
        'keepPosition' => true
    ]
]);

echo \yii\helpers\Html::tag('div', $wizard, [
    'class' => 'col-4'
]);
```

After the initial installation, you only have to start the selenium-standalone server ```selenium-standalone start```
and run the tests ```php.exe .\vendor\bin\codecept run Acceptance``` in the root directory of this repository.

If you do not want to setup an application, just run the unit and functional tests by
running ```php.exe .\vendor\bin\codecept run Unit,Functional```, I can modify and run the acceptance tests for you,
after you opened a pull request.
我最近被指派一項任務,要將幾個廣泛的表單整合到 WordPress 網站中。這些表單包含眾多欄位、複雜的驗證規則、動態欄位(一對多關係),甚至還有相互依賴性,在這種情況下,採用 PHP 繼承可以減少程式碼重複。
在初步探索後,顯而易見的是,在 WordPress 中處理表單的傳統方法通常涉及安裝插件,或使用編輯器或自訂頁面範本手動嵌入標記。隨後,很大程度上依賴插件的功能來管理表單提交,或求助於自訂編碼。
鑑於我的部分任務需要記錄資料、與 API 端點介接、發送電子郵件等等,我選擇自行開發此功能,而不是驗證現有的插件是否支援這些需求。
此外,考慮到當前的情況(截至 2024 年 3 月),根據官方來源,大多數 Yii 3 套件都被認為已準備好用於生產環境,並且身為 Yii 框架的長期用戶,我認為現在是探索和熟悉這些更新的絕佳時機。
原始碼可用 
您可以透過在 Github 上存取整個專案並檢閱程式碼。
此外,您可以透過從專案的根目錄執行 docker-compose up,輕鬆地使用 Docker 部署它。檢查 Dockerfile 以了解 WordPress 設定和內容產生,這些都是自動完成的。
目標 
我的目標是在 WordPress 框架內使用 Yii3 套件來呈現和管理表單。為了示範目的,我選擇實作一個基本的評分表單,重點僅在於驗證資料,而不執行進一步的動作。
方法 
為了繼續進行,我們先以一個極簡的經典主題為例。我在儀表板中建立了一個名為「The Rating Form」的 WordPress 頁面。然後,在主題的根資料夾中建立一個名為 page-the-rating-form.php 的檔案,以顯示這個特定的頁面。
這個指定的檔案作為定義我們表單標記的藍圖。
將 Yii3 套件新增到專案中: 
為了利用 Yii3 的功能,我們將整合以下套件
- yiisoft/form-model:用於定義代表表單欄位的模型類別,並促進欄位呈現。
- yiisoft/form:用於處理標記相關任務。
- yiisoft/validator:用於輸入驗證。
首先,讓我們透過執行 composer init 在我們主題的根目錄中初始化一個 Composer 專案。這個過程將產生一個 composer.json 檔案。隨後,我們將繼續在我們的專案中包含 Yii3 套件。
composer require yiisoft/form-model:dev-master yiisoft/validator yiisoft/form:dev-master
並指示主題透過將以下行新增到 functions.php 檔案來載入 composer autoload
require __DIR__ . '/vendor/autoload.php';
建立表單模型 
在執行 composer init 命令後,已在主題的根目錄中建立一個 src 目錄。我們現在將繼續在這個目錄中新增我們的表單模型類別。
預期專案的擴展,必須保持組織性。因此,我們應建立 src/Forms 目錄,並將 RatingForm 類別放在裡面。
<?php

namespace Glpzzz\Yii3press\Forms;

use Yiisoft\FormModel\FormModel;

class RatingForm extends FormModel
{

	private ?string $name = null;
	private ?string $email = null;
	private ?int $rating = null;
	private ?string $comment = null;
	private string $action = 'the_rating_form';

	public function getPropertyLabels(): array
	{
		return [
			'name' => 'Name',
			'email' => 'Email',
			'rating' => 'Rating',
			'comment' => 'Comment',
		];
	}

}
除了我們評分用例的必要欄位外,觀察 action 類別屬性至關重要。此屬性非常重要,因為它指示 WordPress 哪個主題 hook 應管理表單提交。稍後將對此進行詳細說明。
將驗證規則新增到模型中: 
現在,讓我們將一些驗證規則納入模型中,以確保輸入的完整性。最初,我們將配置類別以實作 RulesProviderInterface。這使表單套件能夠存取這些規則,並使用原生驗證屬性來擴增 HTML 標記。
class RatingForm extends FormModel implements RulesProviderInterface
現在我們需要在類別上實作 getRules() 方法。
public function getRules(): iterable
{
	return [
		'name' => [
			new Required(),
		],
		'email' => [
			new Required(),
			new Email(),
		],
		'rating' => [
			new Required(),
			new Integer(min: 0, max: 5),
		],
		'comment' => [
			new Length(min: 100),
		],
	];
}
建立表單標記 
為了產生表單標記,我們需要將 RatingForm 的實例傳遞給範本。在 WordPress 中,我採用的方法是在呈現頁面之前建立一個全域變數(誠然,這不是最優雅的解決方案)。
$hydrator = new Hydrator(
	new CompositeTypeCaster(
		new NullTypeCaster(emptyString: true),
		new PhpNativeTypeCaster(),
		new HydratorTypeCaster(),
	)
);

add_filter('template_redirect', function () use ($hydrator) {
	// Get the queried object
	$queried_object = get_queried_object();

	// Check if it's a page
	if ($queried_object instanceof WP_Post && is_page()) {
		if ($queried_object->post_name === 'the-rating-form') {
			global $form;
			if ($form === null) {
				$form = $hydrator->create(RatingForm::class, []);
			}
		}
	}
});
值得注意的是,我們在任何特定函數之外實例化了 Hydrator 類別,使我們能夠將其重複用於所有必要的回呼。現在有了 RatingForm 實例,我們將繼續在 page-the-rating-form.php 檔案中製作表單的標記。
<?php

use Glpzzz\Yii3press\Forms\RatingForm;
use Yiisoft\FormModel\Field;
use Yiisoft\Html\Html;

/** @var RatingForm $form */
global $form;

?>


<?php get_header(); ?>

<h1><?php the_title(); ?></h1>

<?php the_content(); ?>

<?= Html::form()
  ->post(esc_url(admin_url('admin-post.php')))
  ->open()
?>

<?= Field::hidden($form, 'action')->name('action') ?>
<?= Field::text($form, 'name') ?>
<?= Field::email($form, 'email') ?>
<?= Field::range($form, 'rating') ?>
<?= Field::textarea($form, 'comment') ?>

<?= Html::submitButton('Send') ?>

<?= "</form>" ?>

<?php get_footer(); ?>
在我們表單的標記生成中,我們利用了 Yii3 的 Html 助手和 Field 類別的組合。值得注意的點包括
- 表單採用 POST 方法,動作指定為
admin-post.phpWordPress 端點。 - 為了在表單提交中包含
action值,我們使用了一個名為'action'的隱藏欄位。我們選擇將輸入重新命名為'action',因為Field::hidden方法以TheFormClassName[the_field_name]格式產生欄位名稱,而我們需要它僅僅命名為'action'。
這個調整有助於掛鉤到主題函數以處理表單請求,如後續章節所述。
在深入探討之前,讓我們利用 Yii 的功能來增強表單。儘管我們已經在模型中定義了驗證規則來驗證提交後的輸入,但在瀏覽器中驗證輸入也是有利的。雖然我們可以重複在輸入元素上直接定義這些驗證規則,但 Yii 提供了一種簡化的方法。透過將以下程式碼片段納入 functions.php 檔案
add_action('init', function () {
	ThemeContainer::initialize([
			'default' => [
				'enrichFromValidationRules' => true,
			]
		], 'default', new ValidationRulesEnricher()
	);
});
透過實作這個程式碼片段,我們為預設表單主題啟用了 ValidationRulesEnricher。啟用後,我們會注意到表單欄位現在已使用驗證規則(例如 'required'、'min' 和 'max')進行擴充,這些規則與先前在模型類別中定義的驗證規則一致。此功能簡化了流程,為我們節省了寶貴的時間,並最大限度地減少了手動程式碼編寫的需求。確實,這展示了 Yii3 提供的一些卓越功能。
處理 POST 請求 
當表單提交時,它會被導向到 admin-post.php,這是 WordPress 提供的一個端點。但是,當處理多個表單時,區分每個表單的處理變得至關重要。這就是在 POST 請求中包含 action 值被證明非常有價值的地方。
請注意以下程式碼片段中的前兩行:hook 的命名慣例是 admin_post_<action_name>。因此,如果表單具有 action = 'the-rating-form',則對應的 hook 名稱將為 admin_post_the_rating_form。
至於同時包含 admin_post_<action_name> 和 admin_post_nopriv_<action_name>,這是因為 WordPress 允許根據使用者是否登入使用不同的處理程序。在我們的場景中,無論使用者的驗證狀態如何,我們都需要相同的處理程序。
add_action('admin_post_the_rating_form', fn() => handleForms($hydrator));
add_action('admin_post_nopriv_the_rating_form', fn() => handleForms($hydrator));

function handleForms(Hydrator $hydrator): void
{
  global $form;
  $form = $hydrator->create(RatingForm::class, $_POST['RatingForm']);
  $result = (new Yiisoft\Validator\Validator())->validate($form);

  if ($form->isValid()) {
    // handle the form
  }

  get_template_part('page-the-rating-form');
}
回到 Yii 方面:我們實例化並使用 hydrator 將發布的資料載入到表單中。然後我們繼續驗證資料。如果驗證成功通過,我們可以使用驗證後的資料繼續執行預期的動作。但是,如果驗證失敗,我們會重新呈現表單,並使用提交的資料和驗證期間產生的任何錯誤訊息來填充它。
結論 
- 這是我第一次嘗試將 Yii3 套件與 WordPress 網站混合使用。雖然我對結果感到滿意,但我認為它可以改進,特別是在使用全域變數方面。由於我對 WordPress 不是很熟悉,我很感謝任何改進建議。
- 我使用的 Yii3 套件已準備好用於實際應用,並提供與舊版本相同的品質和功能。
- 現在您可以獨立使用這些 Yii 套件。這表示您可以將您的 Yii 技能應用於任何 PHP 專案。
- 這個專案展示了我們如何透過利用 Yii 的強大功能來增強 WordPress 網站,同時仍然保持 CMS 的簡潔性。
最初發佈於 https://glpzzz.dev/2024/03/03/integrating-yii3-packages-into-wordpress.html
]]>Yii2 Auditing 
Registra cambios de sus modelos ActiveRecord de Yii2.
Este paquete permite mantener un historial de cambios de los modelos proveyendo información sobre posibles discrepancias o anomalías en la información que puedan indicar actividades sospechosas. La información recibida y almacenada se puede posteriormente desplegar de diversas maneras.
Instalación 
La forma preferida de instalar esta extensión es a través de composer.
Luego ejecute
php composer.phar require --prefer-dist neoacevedo/yii2-auditing "*"
o agregue
"neoacevedo/yii2-auditing": "*"
a la sección require de su archivo composer.json.
Uso 
Una vez que la extensión está instalada, en el archivo de configuración de la consola de su aplicación, agregue en la zona migrationPath
...
'@vendor/neoacevedo/yii2-auditing/neoacevedo/auditing/migrations',
...
luego, agregue en el código de su modelo dentro del método behaviors
public function behaviors()
{
    return [
        [
                'class' => \neoacevedo\auditing\behaviors\AuditBehavior::class,
                'deleteOldData' => true, // Para borrar datos antiguos del registro de eventos
                'deleteNumRows' => 20, // Borra esta cantidad de registros
        ],
        ...
    ];
}
Desplegando la información 
Puede desplegar la información como cualquier modelo que haya implementado dentro de su aplicación web.
Puede hacer uso de un controlador y una vista que use GridView para listar el historial. Por ejemplo, puede crear un controllador que se llame AuditingController y crear el método actionIndex como lo siguiente
    /**
     * Lists all Auditing models.
     *
     * @return string
     */
    public function actionIndex()
    {
        $searchModel = new AuditingSearch();
        $dataProvider = $searchModel->search($this->request->queryParams);

        return $this->render('index', [
            'searchModel' => $searchModel,
            'dataProvider' => $dataProvider,
        ]);
    }
Para visualizar los datos, crear el método actionView
    /**
     * Displays a single Auditing model.
     * @param int $id ID
     * @return string
     * @throws NotFoundHttpException if the model cannot be found
     */
    public function actionView($id)
    {
        return $this->render('view', [
            'model' => $this->findModel($id),
        ]);
    }
Dentro de la vista view puede agregar el GridView para listar el histórico
...
    <?= GridView::widget([
        'dataProvider' => $dataProvider,
        'filterModel' => $searchModel,
        'columns' => [
            ['class' => 'yii\grid\SerialColumn'],
            'id',
            'user_id',
            'description',
            'event',
            'model',
            'attribute',
            'old_value',
            'new_value',
            'action',
            'ip',
            'created_at',
        ],
    ]); ?>
...
Database extension for DM 
A database extension for DM database
安裝 
安裝此擴充套件的首選方法是透過 composer。
執行以下命令
php composer.phar require --prefer-dist luguohuakai/yii2-dm "*"
或新增
"luguohuakai/yii2-dm": "*"
to the require section of your composer.json file.
用法 
Once the extension is installed, simply use it in your code by
'components' => [
    'db' => [
        'class' => 'luguohuakai\db\dm\Connection',
        'dsn' => 'dm:host=localhost:xxx;schema=xxx',
        'username' => 'SYSDBA',
        'password' => 'SYSDBA',
    ]
]
DataTable Widget 
- 總覽
- installation
- Usage Example (PHP Widget)
- Usage Example (Java Script)
- Usage API Side
- Feel Free to contact me : alkhatib.rashed@gmail.com
總覽 
The DataTable widget is used to create interactive and dynamic data tables. The provided JavaScript code demonstrates how to initialize DataTable with server-side processing, custom data handling, and column rendering and with full serverside Export .
installation 
in your Yii2 application : 
- Run :
`composer require rashedalkhatib/yii2-datatables:1.0.0` - go to your
`../frontend/assets/AppAsset.php`- add
rashedalkhatib\datatables\DataTableAssetyour$dependsarray - Ex
        public $depends = [
          'yii\web\YiiAsset',
          'yii\bootstrap\BootstrapAsset',
          'yii\bootstrap\BootstrapPluginAsset',
          'rashedalkhatib\datatables\DataTableAsset'
  ];
- add
Usage Example (PHP Widget) 
- application side 
$searchFormSelector = '#searchForm';
$ajaxUrl = Url::to(['api/yourEndPoint']); // Adjust the URL based on your routes

// Define your DataTable columns
$columns = [
    [
        'title' => 'ID',
        'data' => 'id',
        'visible' => true,
        'render' => new JsExpression('function(data, type, row) {
            return "demo";
        }'),
    ],
];

// Configure other DataTable parameters
$processing = true;
$serverSide = true;
$pageLength = 10;
$dom = 'Btip';
$buttons = [
    [
        'extend' => 'excel',
        'text' => 'Excel',
        'titleAttr' => 'Excel',
        'action' => new JsExpression('exportAll') // this is required
    ],
];

// Configure Ajax settings
$ajaxConfig = [
    'url' => $ajaxUrl,
    'bdestroy' => true,
    'type' => 'POST',
    'data' => new JsExpression('function(d) {
            var searchForm = $('body').find('#searchForm').serializeArray();

            searchForm[searchForm.length] = { name: 'YourModel[page]', value: d.start }; // required
            searchForm[searchForm.length] = { name: 'YourModel[length]', value: d.length }; // required
            searchForm[searchForm.length] = { name: 'YourModel[draw]', value: d.draw }; // required

            var order = {
                'attribute': d.columns[d.order[0]['column']]['data'],
                'dir': d.order[0]['dir']
            }; // required

            searchForm[searchForm.length] = { name: 'YourModel[order]', value: JSON.stringify(order) };
            return searchForm;
    }'),
    'dataSrc' => new JsExpression('function(d) {
        var searchForm = $("' . $searchFormSelector . '").serializeArray();
        if (d.validation) {
            searchForm.yiiActiveForm("updateMessages", d.validation, true);
            return [];
        }
        return d.data;
    }'),
];

// Use the DataTableWidget with configured parameters
DataTable::widget([
    'id' => 'yourDataTable',
    'ajaxConfig' => $ajaxConfig,
    'columns' => $columns,
    'processing' => $processing,
    'serverSide' => $serverSide,
    'pageLength' => $pageLength,
    'dom' => $dom,
    'buttons' => $buttons,
]);

// The HTML container for your DataTable
echo '<form id="searchForm">// your inputs </form>';
echo '<table id="yourDataTable" class="display"></table>';
Usage Example (Java Script) 
- application side 
front end 
<form id="searchForm">
// your inputs
</form>

<table id="yourDataTable" class="display" style="width:100%">


</table>
var arrayToExport = [0,1];
$('#yourDataTable').DataTable({
    "ajax": {
        // Server-side processing configuration
        "url": "../api/yourEndPoint",
        "bdestroy": true, // this allows you to re init the dataTabel and destory it
        "type": "POST", // request method
        "data": function (d) { // this represent the data you are sending with your ajax request
            // Custom function for sending additional parameters to the server
            var searchForm = $('body').find('#searchForm').serializeArray();

            searchForm[searchForm.length] = { name: "YourModel[page]", value: d.start }; // required
            searchForm[searchForm.length] = { name: "YourModel[length]", value: d.length }; // required
            searchForm[searchForm.length] = { name: "YourModel[draw]", value: d.draw }; // required

            var order = {
                'attribute': d.columns[d.order[0]['column']]['data'],
                'dir': d.order[0]['dir']
            }; // required

            searchForm[searchForm.length] = { name: "YourModel[order]", value: JSON.stringify(order) };
            return searchForm;
        },
        dataSrc: function (d) {
            // Custom function to handle the response data
            // EX:
            var searchForm = $('body').find('#searchForm').serializeArray();
            if (d.validation) {
                searchForm.yiiActiveForm('updateMessages', d.validation, true);
                return [];
            }
            return d.data;
        }
    },
    "columns": [{
        // Column configurations
        "title": "ID",
        "data": "id",
        "visible": true // visablity of column
    },
    // ... (other columns)
    {
        "title": "Actions",
        "data": "id",
        "visible": actionCol,
        "render": function (data, type, row) {
            // Custom rendering function for the "Actions" column
            return '<a class="showSomething" data-id="' + row.id + '">View</a>';
        }
    }],
    processing: true,
    serverSide: true,
    "pageLength": 10,
    dom: "Btip",
    "buttons": [{
        // "Excel" button configuration
        "extend": 'excel',
        exportOptions: {
            columns: arrayToExport
        },
        "text": '  Excel',
        "titleAttr": 'Excel',
        "action": exportAll // newexportaction this action is to allow you exporting with server side without rendaring data
    }],
});
application back end 
these params should be sent to the API 
// in your HTTP request you want to include these params
   $_postData = [
   'page' => $this->page == 0 ? 0 : $this->page / $this->length, // this equation is required to handle Yii2 Data provider Logic
   'limit' => $this->length,
   'export' => $this->export,
   'order' => $this->order,
   // add your custom params .....
   ];
these params should be returned to the Datatable endpoint 
return $this->asJson(
                    [
                        'data' => $_scoreData->data,
                        'draw' => $_scoreSearchForm->draw,
                        'recordsTotal' => $_scoreData->count,
                        'recordsFiltered' => $_scoreData->count
                ]);
Usage API Side 
yourEndPoint action 
    public function actionYourEndPoint()
    {

        $searchModel = new SearchModel();

        $dataProvider = $searchModel->search(Yii::$app->request->get());
        return $this->asJson(
            array(
                'data' => $dataProvider['data'],
                'count' => $dataProvider['count']
            )
        );

    }
search function 
    public function search($params)
    {
        $this->load($params, ''); // load your values into the model
        $query = Data::find(); // Data model is your link to the database

        $_order = json_decode($this->order);
        if ($this->export == 'true') {
            $dataProvider = new ActiveDataProvider([
                'query' => $query
                // we removed the page and pageSize keys to allow all data to be exported
            ]);
        } else {
            $_orderType = SORT_ASC;
            if ($_order->dir == 'desc')
                $_orderType = SORT_DESC;
            $query->orderBy([$_order->attribute => $_orderType]);
            $dataProvider = new ActiveDataProvider([
                'query' => $query,
                'pagination' => [
                    'pageSize' => $this->limit,
                    'page' => $this->page,
                ],
            ]);
        }


        return array(
            'data' => $dataProvider->getModels(),
            'count' => $dataProvider->getTotalCount()
        );
    }
Feel Free to contact me : alkhatib.rashed@gmail.com 
]]>Yii2 JSON Attribute Behavior 
This behavior automatically decodes attributes from JSON to arrays before validation, handling errors and re-encoding if validation fails. With this a "real" json string can be further processed.
![]()
安裝 
The preferred way to install this extension is through composer.
執行以下命令
composer require --prefer-dist eluhr/yii2-json-attribute-behavior "*"
或新增
"eluhr/yii2-json-attribute-behavior": "*"
to the require section of your composer.json file.
用法 
In a yii\base\Model or a derivation thereof, the behavior can be used as follows
public function behaviors(): array
{
    $behaviors = parent::behaviors();
    $behaviors['json-attribute'] = [
        'class' => eluhr\jsonAttributeBehavior\JsonAttributeBehavior::class,
        'attributes' => [
            'data_json'
        ]
    ];
    return $behaviors;
}
By using this behavior it does not matter if the attribute is a string or an array. The behavior will always ensure, that the attribute is an array before saving the data to the database and yii will handle the rest.
This behavior supports i18n. By adding the json-attribute-behavior category in your config you can overwrite the default error messages.
測試 
After installing dependencies via composer you can run the tests with
make test
IP2Proxy Yii extension 
IP2Proxy Yii extension enables the user to query an IP address if it was being used as open proxy, web proxy, VPN anonymizer and TOR exit nodes, search engine robots, data center ranges, residential proxies, consumer privacy networks, and enterprise private networks. It lookup the proxy IP address from IP2Proxy BIN Data file or web service. Developers can use the API to query all IP2Proxy BIN databases or web service for applications written using Yii.
INSTALLATION 
For Yii2
- Run the command:
php composer.phar require ip2location/ip2proxy-yiito download the plugin into the Yii2 framework. - Download latest IP2Proxy BIN database
- IP2Proxy free LITE database at https://lite.ip2location.com
- IP2Proxy commercial database at https://www.ip2location.com/proxy-database
- Unzip and copy the BIN file into the Yii2 framework.
Note: The BIN database refers to the binary file ended with .BIN extension, but not the CSV format. Please select the right package for download.
USAGE 
use IP2ProxyYii\IP2Proxy_Yii;

// (required) Define IP2Proxy database path.
define('IP2PROXY_DATABASE', '/path/to/ip2proxy/database');

// (required) Define IP2Location.io API key.
define('IP2LOCATION_IO_API_KEY', 'your_api_key');

// (optional) Define Translation information. Refer to https://www.ip2location.io/ip2location-documentation for available languages.
define('IP2LOCATION_IO_LANGUAGE', 'en');

$IP2Proxy = new IP2Proxy_Yii();

$record = $IP2Proxy->get('1.0.241.135');
echo 'Result from BIN Database:<br>';
echo '<p><strong>IP Address: </strong>' . $record['ipAddress'] . '</p>';
echo '<p><strong>IP Number: </strong>' . $record['ipNumber'] . '</p>';
echo '<p><strong>IP Version: </strong>' . $record['ipVersion'] . '</p>';
echo '<p><strong>Country Code: </strong>' . $record['countryCode'] . '</p>';
echo '<p><strong>Country: </strong>' . $record['countryName'] . '</p>';
echo '<p><strong>State: </strong>' . $record['regionName'] . '</p>';
echo '<p><strong>City: </strong>' . $record['cityName'] . '</p>';
echo '<p><strong>Proxy Type: </strong>' . $record['proxyType'] . '</p>';
echo '<p><strong>Is Proxy: </strong>' . $record['isProxy'] . '</p>';
echo '<p><strong>ISP: </strong>' . $record['isp'] . '</p>';
echo '<p><strong>Domain: </strong>' . $record['domain'] . '</p>';
echo '<p><strong>Usage Type: </strong>' . $record['usageType'] . '</p>';
echo '<p><strong>ASN: </strong>' . $record['asn'] . '</p>';
echo '<p><strong>AS: </strong>' . $record['as'] . '</p>';
echo '<p><strong>Last Seen: </strong>' . $record['lastSeen'] . '</p>';
echo '<p><strong>Threat: </strong>' . $record['threat'] . '</p>';
echo '<p><strong>Provider: </strong>' . $record['provider'] . '</p>';

$record = $IP2Proxy->getWebService('1.0.241.135');
echo 'Result from Web service:<br>';
echo '<pre>';
print_r ($record);
echo '</pre>';
DEPENDENCIES 
This library requires IP2Proxy BIN or IP2Proxy API key data file to function. You may download the BIN data file at
- IP2Proxy LITE BIN Data (Free): https://lite.ip2location.com
- IP2Proxy Commercial BIN Data (Comprehensive): https://www.ip2location.com/proxy-database
You can also sign up for IP2Location.io IP Geolocation API to get one free API key.
SUPPORT 
Email: support@ip2location.com
Website: https://www.ip2location.com
]]>IP2Location Yii extension 
IP2Location Yii extension enables the user to find the country, region, city, coordinates, zip code, time zone, ISP, domain name, connection type, area code, weather, MCC, MNC, mobile brand name, elevation, usage type, IP address type and IAB advertising category from IP address using IP2Location database. It has been optimized for speed and memory utilization. Developers can use the API to query all IP2Location BIN databases or web service for applications written using Yii
INSTALLATION 
For Yii2
- Run the command:
composer require ip2location/ip2location-yiito download the extension into the Yii2 framework. - Download latest IP2Location BIN database
- IP2Location free LITE database at https://lite.ip2location.com
- IP2Location commercial database at https://www.ip2location.com
- Unzip and copy the BIN file into the Yii2 framework.
Note: The BIN database refers to the binary file ended with .BIN extension, but not the CSV format. Please select the right package for download.
USAGE 
use IP2LocationYii\IP2Location_Yii;

// (required) Define IP2Location database path.
define('IP2LOCATION_DATABASE', '/path/to/ip2location/database');

// (required) Define IP2Location.io API key.
define('IP2LOCATION_IO_API_KEY', 'your_api_key');

// (optional) Define Translation information. Refer to https://www.ip2location.io/ip2location-documentation for available languages.
define('IP2LOCATION_IO_LANGUAGE', 'en');

// (optional) Define Translation information. Refer to https://www.ip2location.com/web-service/ip2location for available languages.
define('IP2LOCATION_LANGUAGE', 'en');

$IP2Location = new IP2Location_Yii();

$record = $IP2Location->get('8.8.8.8');
echo 'Result from BIN Database:<br>';
echo 'IP Address: ' . $record['ipAddress'] . '<br>';
echo 'IP Number: ' . $record['ipNumber'] . '<br>';
echo 'ISO Country Code: ' . $record['countryCode'] . '<br>';
echo 'Country Name: ' . $record['countryName'] . '<br>';
echo 'Region Name: ' . $record['regionName'] . '<br>';
echo 'City Name: ' . $record['cityName'] . '<br>';
echo 'Latitude: ' . $record['latitude'] . '<br>';
echo 'Longitude: ' . $record['longitude'] . '<br>';
echo 'ZIP Code: ' . $record['zipCode'] . '<br>';
echo 'Time Zone: ' . $record['timeZone'] . '<br>';
echo 'ISP Name: ' . $record['isp'] . '<br>';
echo 'Domain Name: ' . $record['domainName'] . '<br>';
echo 'Net Speed: ' . $record['netSpeed'] . '<br>';
echo 'IDD Code: ' . $record['iddCode'] . '<br>';
echo 'Area Code: ' . $record['areaCode'] . '<br>';
echo 'Weather Station Code: ' . $record['weatherStationCode'] . '<br>';
echo 'Weather Station Name: ' . $record['weatherStationName'] . '<br>';
echo 'MCC: ' . $record['mcc'] . '<br>';
echo 'MNC: ' . $record['mnc'] . '<br>';
echo 'Mobile Carrier Name: ' . $record['mobileCarrierName'] . '<br>';
echo 'Elevation: ' . $record['elevation'] . '<br>';
echo 'Usage Type: ' . $record['usageType'] . '<br>';
echo 'Address Type: ' . $record['addressType'] . '<br>';
echo 'Category: ' . $record['category'] . '<br>';

$record = $IP2Location->getWebService('8.8.8.8');
echo 'Result from Web service:<br>';
echo '<pre>';
print_r ($record);
echo '</pre>';
DEPENDENCIES 
This library requires IP2Location BIN data file or IP2Location API key to function. You may download the BIN data file at
- IP2Location LITE BIN Data (Free): https://lite.ip2location.com
- IP2Location Commercial BIN Data (Comprehensive): https://www.ip2location.com
You can also sign up for IP2Location.io IP Geolocation API to get one free API key.
SUPPORT 
Email: support@ip2location.com
Website: https://www.ip2location.com
]]>Use the following css styles for carousel to work as expected.
  .product_img_slide {
    padding: 100px 0 0 0;
  }

  .product_img_slide > .carousel-inner > .carousel-item {
    overflow: hidden;
    max-height: 650px;
  }

  .carousel-inner {
    position: relative;
    width: 100%;
  }

  .product_img_slide > .carousel-indicators {
    top: 0;
    left: 0;
    right: 0;
    width: 100%;
    bottom: auto;
    margin: auto;
    font-size: 0;
    cursor: e-resize;
    /* overflow-x: auto; */
    text-align: left;
    padding: 10px 5px;
    /*  overflow-y: hidden;*/
    white-space: nowrap;
    position: absolute;
  }

  .product_img_slide > .carousel-indicators li {
    padding: 0;
    width: 76px;
    height: 76px;
    margin: 0 5px;
    text-indent: 0;
    cursor: pointer;
    background: transparent;
    border: 3px solid #333331;
    -webkit-border-radius: 0;
    border-radius: 0;
    -webkit-transition: all 0.7s cubic-bezier(0.22, 0.81, 0.01, 0.99);
    transition: all 1s cubic-bezier(0.22, 0.81, 0.01, 0.99);
  }

  .product_img_slide > .carousel-indicators .active {
    width: 76px;
    border: 0;
    height: 76px;
    margin: 0 5px;
    background: transparent;
    border: 3px solid #c13c3d;
  }

  .product_img_slide > .carousel-indicators > li > img {
    display: block;
    /*width:114px;*/
    height: 76px;
  }

  .product_img_slide .carousel-inner > .carousel-item > a > img, .carousel-inner > .carousel-item > img, .img-responsive, .thumbnail a > img, .thumbnail > img {
    display: block;
    max-width: 100%;
    line-height: 1;
    margin: auto;
  }

  .product_img_slide .carousel-control-prev {
    top: 58%;
    /*left: auto;*/
    right: 76px;
    opacity: 1;
    width: 50px;
    bottom: auto;
    height: 50px;
    font-size: 50px;
    cursor: pointer;
    font-weight: 700;
    overflow: hidden;
    line-height: 50px;
    text-shadow: none;
    text-align: center;
    position: absolute;
    background: transparent;
    text-transform: uppercase;
    color: rgba(255, 255, 255, 0.6);
    -webkit-box-shadow: none;
    box-shadow: none;
    -webkit-border-radius: 0;
    border-radius: 0;
    -webkit-transition: all 0.6s cubic-bezier(0.22, 0.81, 0.01, 0.99);
    transition: all 0.6s cubic-bezier(0.22, 0.81, 0.01, 0.99);
  }

  .product_img_slide .carousel-control-next {
    top: 58%;
    left: auto;
    right: 25px;
    opacity: 1;
    width: 50px;
    bottom: auto;
    height: 50px;
    font-size: 50px;
    cursor: pointer;
    font-weight: 700;
    overflow: hidden;
    line-height: 50px;
    text-shadow: none;
    text-align: center;
    position: absolute;
    background: transparent;
    text-transform: uppercase;
    color: rgba(255, 255, 255, 0.6);
    -webkit-box-shadow: none;
    box-shadow: none;
    -webkit-border-radius: 0;
    border-radius: 0;
    -webkit-transition: all 0.6s cubic-bezier(0.22, 0.81, 0.01, 0.99);
    transition: all 0.6s cubic-bezier(0.22, 0.81, 0.01, 0.99);
  }

  .product_img_slide .carousel-control-next:hover, .product_img_slide .carousel-control-prev:hover {
    color: #c13c3d;
    background: transparent;
  }
Here is a Corousel widget that is an extension of yii\bootstrap5\Carousel, to show image thumbnails as indicators for the carousel.
Here is the widget code.
<?php
namespace app\widgets;
use Yii;
use yii\bootstrap5\Html;

class Carousel extends \yii\bootstrap5\Carousel
{
    public $thumbnails = [];

    public function init()
    {
        parent::init();
        Html::addCssClass($this->options, ['data-bs-ride' => 'carousel']);
        if ($this->crossfade) {
            Html::addCssClass($this->options, ['animation' => 'carousel-fade']);
        }
    }

    public function renderIndicators(): string
    {
        if ($this->showIndicators === false){
            return '';
        }
        $indicators = [];
        for ($i = 0, $count = count($this->items); $i < $count; $i++){
            $options = [
                'data' => [
                    'bs-target' => '#' . $this->options['id'],
                    'bs-slide-to' => $i
                ],
                'type' => 'button',
                'thumb' => $this->thumbnails[$i]['thumb']
            ];
            if ($i === 0){
                Html::addCssClass($options, ['activate' => 'active']);
                $options['aria']['current'] = 'true';
            }

             $indicators[] = Html::tag('li',Html::img($options['thumb']), $options);
        }
        return Html::tag('ol', implode("\n", $indicators), ['class' => ['carousel-indicators']]);
    } }
You can use the above widget in your view file as below
    <?php
$indicators = [
   '0' =>[ 'thumb' => "https://placehold.co/150X150?text=A"],
   '1' => ['thumb' => 'https://placehold.co/150X150?text=B'],
   '2' => [ 'thumb' => 'https://placehold.co/150X150?text=C']
];
$items = [
    [ 'content' =>Html::img('https://live.staticflickr.com/8333/8417172316_c44629715e_w.jpg')],
    [ 'content' =>Html::img('https://live.staticflickr.com/3812/9428789546_3a6ba98c49_w.jpg')],
    [ 'content' =>Html::img('https://live.staticflickr.com/8514/8468174902_a8b505a063_w.jpg')]
];

echo Carousel::widget([
    'items' =>
        $items,
     'thumbnails'  => $indicators,
     'options' => [
          'data-interval' => 3, 'data-bs-ride' => 'scroll','class' => 'carousel product_img_slide',
      ],

]);
How To Add Internationalisation to the NavBar Menu in Yii2 
- Create the required Files
- Edit the /config/web.php file
- Edit all the files in the "views" folder and any sub folders
- Create the texts to be translated
- Create a Menu Item (Dropdown) to Change the Language
- Optional Items
Yii comes with internationalisation (i18n) "out of the box". There are instructions in the manual as to how to configure Yii to use i18n, but little information all in one place on how to fully integrate it into the bootstrap menu. This document attempts to remedy that.
The Github repository also contains the language flags, some country flags, a list of languages codes and their language names and a list of the languages Yii recognises "out of the box". A video will be posted on YouTube soon.
Ensure that your system is set up to use i18n. From the Yii2 Manual
Yii uses the
PHP intlextension to provide most of its I18N features, such as the date and number formatting of theyii\i18n\Formatterclass and the message formatting usingyii\i18n\MessageFormatter. Both classes provide a fallback mechanism when the intl extension is not installed. However, the fallback implementation only works well for English target language. So it is highly recommended that you installintlwhen I18N is needed.
Create the required Files 
First you need to create a configuration file.
Decide where to store it (e.g. in the ./messages/ directory with the name create_i18n.php). Create the directory in the project then issue the following command from Terminal (Windows: CMD) from the root directory of your project
./yii message/config-template ./messages/create_i18n.php
or for more granularity
./yii message/config --languages=en-US --sourcePath=@app --messagePath=messages ./messages/create_i18n.php
In the newly created file, alter (or create) the array of languages to be translated
  // array, required, list of language codes that the extracted messages
  // should be translated to. For example, ['zh-CN', 'de'].
  'languages' => [
    'en-US',
    'fr',
    'pt'
  ],
If necessary, change the root directory in create_i18n.php to point to the messages directory - the default is messages. Note, if the above file is in the messages directory (recommended) then don't alter this 'messagePath' => __DIR__,. If you alter the directory for messages to, say, /config/ (not a good idea) you can use the following
  // Root directory containing message translations.
  'messagePath' => __DIR__ . DIRECTORY_SEPARATOR . 'config',
The created file should look something like this after editing the languages you need
<?php

return [
  // string, required, root directory of all source files
  'sourcePath' => __DIR__ . DIRECTORY_SEPARATOR . '..',
  // array, required, list of language codes (in alphabetical order) that the extracted messages
  // should be translated to. For example, ['zh-CN', 'de'].
  'languages' => [
    // to localise a particular language use the language code followed by the dialect in CAPS
    'en-US',  // USA English
    'es',
    'fr',
    'it',
    'pt',
  ],
  /* 'languages' => [
    'af', 'ar', 'az', 'be', 'bg', 'bs', 'ca', 'cs', 'da', 'de', 'el', 'es', 'et', 'fa', 'fi', 'fr', 'he', 'hi',
    'pt-BR', 'ro', 'hr', 'hu', 'hy', 'id', 'it', 'ja', 'ka', 'kk', 'ko', 'kz', 'lt', 'lv', 'ms', 'nb-NO', 'nl',
    'pl', 'pt', 'ru', 'sk', 'sl', 'sr', 'sr-Latn', 'sv', 'tg', 'th', 'tr', 'uk', 'uz', 'uz-Cy', 'vi', 'zh-CN',
    'zh-TW'
    ], */
  // string, the name of the function for translating messages.
  // Defaults to 'Yii::t'. This is used as a mark to find the messages to be
  // translated. You may use a string for single function name or an array for
  // multiple function names.
  'translator' => ['\Yii::t', 'Yii::t'],
  // boolean, whether to sort messages by keys when merging new messages
  // with the existing ones. Defaults to false, which means the new (untranslated)
  // messages will be separated from the old (translated) ones.
  'sort' => false,
  // boolean, whether to remove messages that no longer appear in the source code.
  // Defaults to false, which means these messages will NOT be removed.
  'removeUnused' => false,
  // boolean, whether to mark messages that no longer appear in the source code.
  // Defaults to true, which means each of these messages will be enclosed with a pair of '@@' marks.
  'markUnused' => true,
  // array, list of patterns that specify which files (not directories) should be processed.
  // If empty or not set, all files will be processed.
  // See helpers/FileHelper::findFiles() for pattern matching rules.
  // If a file/directory matches both a pattern in "only" and "except", it will NOT be processed.
  'only' => ['*.php'],
  // array, list of patterns that specify which files/directories should NOT be processed.
  // If empty or not set, all files/directories will be processed.
  // See helpers/FileHelper::findFiles() for pattern matching rules.
  // If a file/directory matches both a pattern in "only" and "except", it will NOT be processed.
  'except' => [
    '.*',
    '/.*',
    '/messages',
    '/migrations',
    '/tests',
    '/runtime',
    '/vendor',
    '/BaseYii.php',
  ],
  // 'php' output format is for saving messages to php files.
  'format' => 'php',
  // Root directory containing message translations.
  'messagePath' => __DIR__,
  // boolean, whether the message file should be overwritten with the merged messages
  'overwrite' => true,
  /*
    // File header used in generated messages files
    'phpFileHeader' => '',
    // PHPDoc used for array of messages with generated messages files
    'phpDocBlock' => null,
   */

  /*
    // Message categories to ignore
    'ignoreCategories' => [
    'yii',
    ],
   */

  /*
    // 'db' output format is for saving messages to database.
    'format' => 'db',
    // Connection component to use. Optional.
    'db' => 'db',
    // Custom source message table. Optional.
    // 'sourceMessageTable' => '{{%source_message}}',
    // Custom name for translation message table. Optional.
    // 'messageTable' => '{{%message}}',
   */

  /*
    // 'po' output format is for saving messages to gettext po files.
    'format' => 'po',
    // Root directory containing message translations.
    'messagePath' => __DIR__ . DIRECTORY_SEPARATOR . 'messages',
    // Name of the file that will be used for translations.
    'catalog' => 'messages',
    // boolean, whether the message file should be overwritten with the merged messages
    'overwrite' => true,
   */
];
Edit the /config/web.php file 
In the web.php file, below 'id' => 'basic', add
  'language' => 'en',
  'sourceLanguage' => 'en',
Note: you should always use the 'sourceLanguage' => 'en' as it is, usually, easier and cheaper to translate from English into another language. If the sourceLanguage is not set it defaults to 'en'.
Add the following to the 'components' => [...] section
    'i18n' => [
      'translations' => [
        'app*' => [
          'class' => 'yii\i18n\PhpMessageSource',  // Using text files (usually faster) for the translations
          //'basePath' => '@app/messages',  // Uncomment and change this if your folder is not called 'messages'
          'sourceLanguage' => 'en',
          'fileMap' => [
            'app' => 'app.php',
            'app/error' => 'error.php',
          ],
          //  Comment out in production version
          //  'on missingTranslation' => ['app\components\TranslationEventHandler', 'handleMissingTranslation'],
        ],
      ],
    ],
Edit all the files in the "views" folder and any sub folders 
Now tell Yii which text you want to translate in your view files. This is done by adding Yii::t('app', 'text to be translated') to the code.
For example, in /views/layouts/main.php, change the menu labels like so
    'items' => [
          //  ['label' => 'Home', 'url' => ['/site/index']],	// Orignal code
          ['label' => Yii::t('app', 'Home'), 'url' => ['/site/index']],
          ['label' => Yii::t('app', 'About'), 'url' => ['/site/about']],
          ['label' => Yii::t('app', 'Contact'), 'url' => ['/site/contact']],
          Yii::$app->user->isGuest ? ['label' => Yii::t('app', 'Login'), 'url' => ['/site/login']] : '<li class="nav-item">'
            . Html::beginForm(['/site/logout'])
            . Html::submitButton(
             // 'Logout (' . Yii::$app->user->identity->username . ')', // change this line as well to the following:
              Yii::t('app', 'Logout ({username})'), ['username' => Yii::$app->user->identity->username]),
              ['class' => 'nav-link btn btn-link logout']
            )
            . Html::endForm()
            . '</li>',
        ],
Create the texts to be translated 
To create the translation files, run the following, in Terminal, from the root directory of your project
./yii message ./messages/create_i18n.php
Now, get the messages translated. For example in the French /messages/fr/app.php
  'Home' => 'Accueil',
  'About' => 'À propos',
  ...
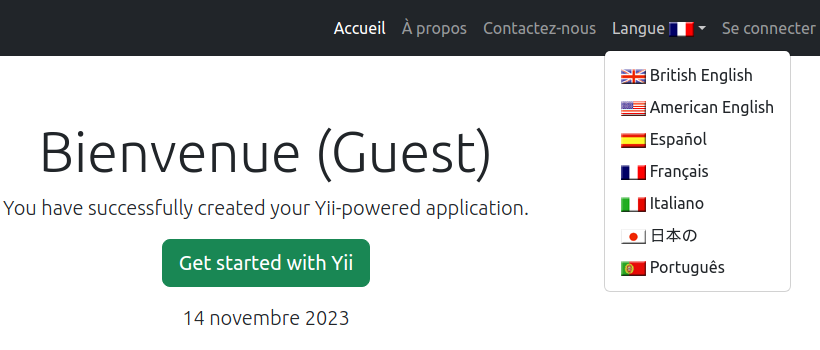
Create a Menu Item (Dropdown) to Change the Language 
This takes a number of steps.
1. Create an array of languages required 
A key and a name is required for each language.
The key is the ICU language code ISO 639.1 in lowercase (with optional Country code ISO 3166 in uppercase) e.g.
French:
fror French Canada:fr-CAPortuguese:
ptor Portuguese Brazil:pt-BR
The name is the name of the language in that language. e.g. for French: 'Français', for Japanese: '日本の'. This is important as the user may not understand the browser's current language.
In /config/params.php create an array named languages with the languages required. For example
  /* 		List of languages and their codes
   *
   * 		format:
   * 		'Language Code' => 'Language Name',
   * 		e.g.
   * 		'fr' => 'Français',
   *
   * 		please use alphabetical order of language code
   * 		Use the language name in the "user's" Language
   *            e.g.
   *            'ja' => '日本の',
   */
  'languages' => [
//    'da' => 'Danske',
//    'de' => 'Deutsche',
//    'en' => 'English', // NOT REQUIRED the sourceLanguage (i.e. the default)
    'en-GB' => 'British English',
    'en-US' => 'American English',
    'es' => 'Español',
    'fr' => 'Français',
    'it' => 'Italiano',
//    'ja' => '日本の',  // Japanese with the word "Japanese" in Kanji
//    'nl' => 'Nederlandse',
//    'no' => 'Norsk',
//    'pl' => 'Polski',
    'pt' => 'Português',
//    'ru' => 'Русский',
//    'sw' => 'Svensk',
//    'zh' => '中国的',
  ],
2. Create an Action 
In /controllers/SiteController.php, the default controller, add an "Action" named actionLanguage(). This "Action" changes the language and sets a cookie so the browser "remembers" the language for page requests and return visits to the site.
  /**
   * Called by the ajax handler to change the language and
   * Sets a cookie based on the language selected
   *
   */
  public function actionLanguage()
  {
    $lang = Yii::$app->request->post('lang');
    // If the language "key" is not NULL and exists in the languages array in params.php, change the language and set the cookie
    if ($lang !== NULL && array_key_exists($lang, Yii::$app->params['languages']))
    {
      $expire = time() + (60 * 60 * 24 * 365); //  1 year - alter accordingly
      Yii::$app->language = $lang;
      $cookie = new yii\web\Cookie([
        'name' => 'lang',
        'value' => $lang,
        'expire' => $expire,
      ]);
      Yii::$app->getResponse()->getCookies()->add($cookie);
    }
    Yii::$app->end();
  }
Remember to set the method to POST. In behaviors(), under actions, set 'language' => ['post'], like so
      'verbs' => [
        'class' => VerbFilter::class,
        'actions' => [
          'logout' => ['post'],
          'language' => ['post'],
        ],
      ],
3. Create a Language Handler 
Make sure that the correct language is served for each request.
In the /components/ directory, create a file named: LanguageHandler.php and add the following code to it
<?php

/*
 * Copyright ©2023 JQL all rights reserved.
 * http://www.jql.co.uk
 */
/*
  Created on : 19-Nov-2023, 13:23:54
  Author     : John Lavelle
  Title      : LanguageHandler
 */

namespace app\components;

use yii\helpers\Html;

class LanguageHandler extends \yii\base\Behavior
{

	public function events()
	{
		return [\yii\web\Application::EVENT_BEFORE_REQUEST => 'handleBeginRequest'];
	}

	public function handleBeginRequest($event)
	{
		if (\Yii::$app->getRequest()->getCookies()->has('lang') && array_key_exists(\Yii::$app->getRequest()->getCookies()->getValue('lang'), \Yii::$app->params['languages']))
		{
      //  Get the language from the cookie if set
			\Yii::$app->language = \Yii::$app->getRequest()->getCookies()->getValue('lang');
		}
		else
		{
			//	Use the browser language - note: some systems use an underscore, if used, change it to a hyphen
			\Yii::$app->language = str_replace('_', '-', HTML::encode(locale_accept_from_http($_SERVER['HTTP_ACCEPT_LANGUAGE'])));
		}
	}

}

/* End of file LanguageHandler.php */
/* Location: ./components/LanguageHandler.php */
4. Call LanguageHandler.php from /config/web.php 
"Call" the LanguageHandler.php file from /config/web.php by adding the following to either just above or just below 'params' => $params,
  //	Update the language on selection
  'as beforeRequest' => [
    'class' => 'app\components\LanguageHandler',
  ],
5. Add the Language Menu Item to /views/layouts/main.php 
main.php uses Bootstrap to create the menu. An item (Dropdown) needs to be added to the menu to allow the user to select a language.
Add use yii\helpers\Url; to the "uses" section of main.php.
Just above echo Nav::widget([...]) add the following code
// Get the languages and their keys, also the current route
      foreach (Yii::$app->params['languages'] as $key => $language)
      {
        $items[] = [
          'label' => $language, // Language name in it's language - already translated
          'url' => Url::to(['site/index']), // Route
          'linkOptions' => ['id' => $key, 'class' => 'language'], // The language "key"
        ];
      }
In the section
echo Nav::widget([...])`
between
'options' => ['class' => 'navbar-nav ms-auto'], // ms-auto aligns the menu right`
and
'items' => [...]
add
'encodeLabels' => false, // Required to enter HTML into the labels
like so
      echo Nav::widget([
        'options' => ['class' => 'navbar-nav ms-auto'], // ms-auto aligns the menu right
        'encodeLabels' => false, // Required to enter HTML into the labels
        'items' => [
          ['label' => Yii::t('app', 'Home'), 'url' => ['/site/index']],
        ...
Now add the Dropdown. This can be placed anywhere in 'items' => [...].
// Dropdown Nav Menu: https://yii.dev.org.tw/doc/api/2.0/yii-widgets-menu
        [
          'label' => Yii::t('app', 'Language')),
          'url' => ['#'],
          'options' => ['class' => 'language', 'id' => 'languageTop'],
          'encodeLabels' => false, // Optional but required to enter HTML into the labels for images
          'items' => $items, // add the languages into the Dropdown
        ],
The code in main.php for the NavBar should look something like this
      NavBar::begin([
        'brandLabel' => Yii::$app->name,  // set in /config/web.php
        'brandUrl' => Yii::$app->homeUrl,
        'options' => ['class' => 'navbar-expand-md navbar-dark bg-dark fixed-top']
      ]);
      // Get the languages and their keys, also the current route
      foreach (Yii::$app->params['languages'] as $key => $language)
      {
        $items[] = [
          'label' => $language, // Language name in it's language
          'url' => Url::to(['site/index']), // Current route so the page refreshes
          'linkOptions' => ['id' => $key, 'class' => 'language'], // The language key
        ];
      }
      echo Nav::widget([
        'options' => ['class' => 'navbar-nav ms-auto'], // ms-auto aligns the menu right
        'encodeLabels' => false, // Required to enter HTML into the labels
        'items' => [
          ['label' => Yii::t('app', 'Home'), 'url' => ['/site/index']],
          ['label' => Yii::t('app', 'About'), 'url' => ['/site/about']],
          ['label' => Yii::t('app', 'Contact'), 'url' => ['/site/contact']],
          // Dropdown Nav Menu: https://yii.dev.org.tw/doc/api/2.0/yii-widgets-menu
          [
            'label' => Yii::t('app', 'Language') ,
            'url' => ['#'],
            'options' => ['class' => 'language', 'id' => 'languageTop'],
            'encodeLabels' => false, // Required to enter HTML into the labels
            'items' => $items, // add the languages into the Dropdown
          ],
          Yii::$app->user->isGuest ? ['label' => Yii::t('app', 'Login'), 'url' => ['/site/login']] : '<li class="nav-item">'
            . Html::beginForm(['/site/logout'])
            . Html::submitButton(
//              'Logout (' . Yii::$app->user->identity->username . ')',
              Yii::t('app', 'Logout ({username})', ['username' => Yii::$app->user->identity->username]),
              ['class' => 'nav-link btn btn-link logout']
            )
            . Html::endForm()
            . '</li>',
        ],
      ]);
      NavBar::end();
If Language flags or images are required next to the language name see Optional Items at the end of this document.
6. Trigger the Language change with an Ajax call 
To call the Language Action actionLanguage() make an Ajax call in a JavaScript file.
Create a file in /web/js/ named language.js.
Add the following code to the file
/*
 * Copyright ©2023 JQL all rights reserved.
 * http://www.jql.co.uk
 */

/**
 * Set the language
 *
 * @returns {undefined}
 */
$(function () {
  $(document).on('click', '.language', function (event) {
    event.preventDefault();
    let lang = $(this).attr('id');  // Get the language key
    /* if not the top level, set the language and reload the page */
    if (lang !== 'languageTop') {
      $.post(document.location.origin + '/site/language', {'lang': lang}, function (data) {
        location.reload(true);
      });
    }
  });
});
To add the JavaScript file to the Assets, alter /assets/AppAsset.php in the project directory. In public $js = [] add 'js/language.js', like so
     public $js = [
       'js/language.js',
     ];
Internationalisation should now be working on your project.
Optional Items 
The following are optional but may help both you and/or the user.
1. Check for Translations 
Yii can check whether a translation is present for a particular piece of text in a Yii::t('app', 'text to be translated') block.
There are two steps
A. In /config/web.php uncomment the following line
// 'on missingTranslation' => ['app\components\TranslationEventHandler', 'handleMissingTranslation'],
B. Create a TranslationEventHandler
In /components/ create a file named: TranslationEventHandler.php and add the following code to it
<?php

/**
 * TranslationEventHandler
 *
 * @copyright © 2023, John Lavelle  Created on : 14 Nov 2023, 16:05:32
 *
 *
 * Author     : John Lavelle
 * Title      : TranslationEventHandler
 */
// Change the Namespace (app, frontend, backend, console etc.) if necessary (default in Yii Basic is "app").

namespace app\components;

use yii\i18n\MissingTranslationEvent;

/**
 * TranslationEventHandler
 *
 *
 * @author John Lavelle
 * @since 1.0 // Update version number
 */
class TranslationEventHandler
{

  /**
   * Adds a message to missing translations in Development Environment only
   *
   * @param MissingTranslationEvent $event
   */
  public static function handleMissingTranslation(MissingTranslationEvent $event)
  {
    // Only check in the development environment
    if (YII_ENV_DEV)
    {
      $event->translatedMessage = "@MISSING: {$event->category}.{$event->message} FOR LANGUAGE {$event->language} @";
    }
  }
}
If there is a missing translation, the text is replaced with a message similar to the following text
@MISSING: app.Logout (John) FOR LANGUAGE fr @
Here Yii has found that there is no French translation for
Yii::t('app', 'Logout ({username})', ['username' => Yii::$app->user->identity->username]),
2. Add Language Flags to the Dropdown Menu 
這非常有用且值得推薦,因為它可以幫助使用者找到正確的語言。 這其中包含許多步驟。
a. 建立旗幟的圖片。
圖片的寬度應為 25 像素,高度應為 15 像素。 圖片必須與 params.php 中語言陣列中的語言鍵名稱相同。 例如:fr.png 或 en-US.png。 如果圖片類型不是「.png」,請將下方b. 部分中的程式碼變更為正確的檔案副檔名。
將圖片放置在 /web/images/flags/ 目錄中。
b. 變更 /views/layouts/main.php 中的程式碼,使「NavBar」的程式碼如下所示
<header id="header">
      <?php
      NavBar::begin([
        'brandLabel' => Yii::$app->name,
        'brandUrl' => Yii::$app->homeUrl,
        'options' => ['class' => 'navbar-expand-md navbar-dark bg-dark fixed-top']
      ]);
      // Get the languages and their keys, also the current route
      foreach (Yii::$app->params['languages'] as $key => $language)
      {
        $items[] = [
	// Display the image before the language name
          'label' => Html::img('/images/flags/' . $key . '.png', ['alt' => 'flag ' . $language, 'class' => 'inline-block align-middle', 'title' => $language,]) . ' ' . $language, // Language name in it's language
          'url' => Url::to(['site/index']), // Route
          'linkOptions' => ['id' => $key, 'class' => 'language'], // The language key
        ];
      }
      echo Nav::widget([
        'options' => ['class' => 'navbar-nav ms-auto'], // ms-auto aligns the menu right
        'encodeLabels' => false, // Required to enter HTML into the labels
        'items' => [
          ['label' => Yii::t('app', 'Home'), 'url' => ['/site/index']],
          ['label' => Yii::t('app', 'About'), 'url' => ['/site/about']],
          ['label' => Yii::t('app', 'Contact'), 'url' => ['/site/contact']],
          // Dropdown Nav Menu: https://yii.dev.org.tw/doc/api/2.0/yii-widgets-menu
          [
	  // Display the current language "flag" after the Dropdown title (before the caret)
            'label' => Yii::t('app', 'Language') . ' ' . Html::img('@web/images/flags/' . Yii::$app->language . '.png', ['class' => 'inline-block align-middle', 'title' => Yii::$app->language]),
            'url' => ['#'],
            'options' => ['class' => 'language', 'id' => 'languageTop'],
            'encodeLabels' => false, // Required to enter HTML into the labels
            'items' => $items, // add the languages into the Dropdown
          ],
          Yii::$app->user->isGuest ? ['label' => Yii::t('app', 'Login'), 'url' => ['/site/login']] : '<li class="nav-item">'
            . Html::beginForm(['/site/logout'])
            . Html::submitButton(
//              'Logout (' . Yii::$app->user->identity->username . ')',
              Yii::t('app', 'Logout ({username})', ['username' => Yii::$app->user->identity->username]),
              ['class' => 'nav-link btn btn-link logout']
            )
            . Html::endForm()
            . '</li>',
        ],
      ]);
      NavBar::end();
      ?>
    </header>
就這樣! 請享用...
如需進一步閱讀和資訊,請參閱
如果您使用此程式碼,請以下列方式註明我的貢獻
國際化 (i18n) 選單程式碼由 JQL 提供,https://visualaccounts.co.uk ©2023 JQL
授權條款 (BSD-3-Clause Licence)
著作權聲明
國際化 (i18n) 選單程式碼由 JQL 提供,https://visualaccounts.co.uk ©2023 JQL 保留所有權利
在符合下列條件的情況下,允許以原始碼和二進位形式重新發布和使用,無論是否經過修改
原始碼的重新發布必須保留上述著作權聲明、此條件列表和以下免責聲明。
二進位形式的重新發布必須在隨發行版提供的文件和/或其他材料中,重製上述著作權聲明、此條件列表和以下免責聲明。
未經事先書面許可,不得使用 John Lavelle、JQL、Visual Accounts 或其貢獻者的名稱來背書或推廣衍生自此軟體的產品。
「所有 JQL 程式碼和軟體,包括全球資訊網頁面(及其作者的網頁),均以「現狀」提供,不提供任何形式的保證。 在法律允許的最大範圍內,作者、發行商及其代理人明確聲明不承擔任何明示或暗示的保證,包括但不限於對適銷性和特定用途適用性的暗示保證。 關於該程式碼,作者、發行商及其代理人對因使用該程式碼而直接或間接引起的任何損失或損害概不負責,即使作者和/或發行商及其代理人已被告知發生此類損害的可能性。 在不限制前述規定的情況下,作者、發行商及其代理人對任何利潤損失、業務中斷、設備或資料損壞、營運中斷或任何其他商業損害概不負責,包括但不限於直接、間接、特殊、附帶、後果性或其他損害。」
]]>這是一個使用 yii2 基本應用程式範本建立的應用程式範本,用於示範我的擴充功能 slideradmin 的用法
安裝 
- 從 Github 下載 repo 並將其內容解壓縮到任何資料夾中。
- 執行 composer update 命令。
- 執行 migration 命令: php yii migrate --migrationPath="@vendor/siripravi/yii2-slideradmin/migrations"
- 完成。
nkchartjs 
]]>有多種方法可以建立驗證器,但在這裡我們使用正規表示式或 JavaScript 正規表示式或 RegExp 來建立驗證器。 在本文中,我們將看到最常用的表示式
步驟 1: 建立一個新的驗證器類別,如下所示或 驗證器
請參閱第一個範例 10 位數手機號碼驗證
<?php

namespace common\validators;

use yii\validators\Validator;

class MobileValidator extends Validator {

    public function validateAttribute($model, $attribute) {
        if (isset($model->$attribute) and $model->$attribute != '') {
             if (!preg_match('/^[123456789]\d{9}$/', $model->$attribute)) {
                $this->addError($model, $attribute, 'In Valid Mobile / Phone number');
            }
        }
    }

}
在這裡,我們可以根據需求撰寫不同的正規表示式 `php preg_match('/^[123456789]\d{9}$/', $model->$attribute) `
步驟 2: 如何使用驗證器
我希望每個人都知道如何使用驗證器,但這裡有一個範例說明如何使用它。
在您的模型類別中新增一個新規則,如下所示 `php [['mobile'],\common\validators\MobileValidator::class], [['mobile'], 'string', 'max' => 10],
So It's Very Simple to use a Custom Validator.


As I Told you Earlier that i show you some more Example for Using Regular Expression  Validator Just Replace these string in preg_match.

1. Aadhar Number Validator
```php
preg_match('/^[2-9]{1}[0-9]{3}[0-9]{4}[0-9]{4}$/', $model->$attribute)
銀行帳戶號碼驗證器
`php preg_match("/^[0-9]{9,18}+$/", $model->$attribute)`銀行 IFSC 代碼驗證器
`php preg_match("/^[A-Z]{4}0[A-Z0-9]{6}$/", $model->$attribute)`Pan 卡號碼驗證器
`php preg_match('/^([a-zA-Z]){5}([0-9]){4}([a-zA-Z]){1}?$/', $model->$attribute)`Pin 碼驗證器
`php preg_match('/^[0-9]{6}+$/', $model->$attribute)`GSTIN 驗證器
`php preg_match("/^([0][1-9]|[1-2][0-9]|[3][0-5])([a-zA-Z]{5}[0-9]{4}[a-zA-Z]{1}[1-9a-zA-Z]{1}[zZ]{1}[0-9a-zA-Z]{1})+$/", $model->$attribute)`
這是其他類型的自訂驗證器
- 字串的 500 字驗證器
<?php

namespace common\validators;

use yii\validators\Validator;

/**
 * Class Word500Validator
 * @author Aayush Saini <aayushsaini9999@gmail.com>
 */
class Word500Validator extends Validator
{

    public function validateAttribute($model, $attribute)
    {
        if ($model->$attribute != '') {
            if (str_word_count($model->$attribute) > 500) {
                $this->addError($model, $attribute, $model->getAttributeLabel($attribute) . ' length can not exceeded 500 words.');
                \Yii::$app->response->format = \yii\web\Response::FORMAT_JSON;
                return $model->errors;
            }
        }
    }
}
現在我假設在閱讀本文後,您可以根據您的需求建立任何類型的驗證器。
:) 感謝您的閱讀
]]>GridView 在頁尾中顯示欄位的總和 `PHP use yii\grid\DataColumn;
/**
- 欄位中所有值的總和
@author shiv / class TSumColumn extends DataColumn { public function getDataCellValue($model, $key, $index) {
 $value = parent::getDataCellValue($model, $key, $index);
 if ( is_numeric($value))
 {
     $this->footer += $value;
 }

 return $value;
} }
`
現在您必須在 GridView 中啟用頁尾
echo GridView::widget([
        'dataProvider' => $dataProvider,
        'filterModel' => $searchModel,
        'showFooter' => true,
同時變更欄位類別
            [
                'class' => TSumColumn::class,
                'attribute' => 'amount'
            ],
您會在網格的頁尾中看到總計。 如果需要,您可以將此應用於多個欄位
]]>我有一個呼叫可以幫助我直接在 HTML 表格中顯示 json。
Json2Table::formatContent($json);
Json2Table 類別的程式碼在此
============================================
/**
 * Class convert Json to html table. It help view json data directly.
 * @author shiv
 *
 */
class Json2Table
{

    public static function formatContent($content, $class = 'table table-bordered')
    {
        $html = "";
        if ($content != null) {
            $arr = json_decode(strip_tags($content), true);

            if ($arr && is_array($arr)) {
                $html .= self::arrayToHtmlTableRecursive($arr, $class);
            }
        }
        return $html;
    }

    public static function arrayToHtmlTableRecursive($arr, $class = 'table table-bordered')
    {
        $str = "<table class='$class'><tbody>";
        foreach ($arr as $key => $val) {
            $str .= "<tr>";
            $str .= "<td>$key</td>";
            $str .= "<td>";
            if (is_array($val)) {
                if (! empty($val)) {
                    $str .= self::arrayToHtmlTableRecursive($val, $class);
                }
            } else {
                $val = nl2br($val);
                $str .= "<strong>$val</strong>";
            }
            $str .= "</td></tr>";
        }
        $str .= "</tbody></table>";

        return $str;
    }
}
在印度,我們有 Aadhar 號碼,我們可能需要驗證輸入。 因此,我為 yii2 建立了一個驗證器
use yii\validators\Validator;

class TAadharNumberValidator extends Validator
{

    public $regExPattern = '/^\d{4}\s\d{4}\s\d{4}$/';

    public function validateAttribute($model, $attribute)
    {
        if (preg_match($this->regExPattern, $model->$attribute)) {
            $model->addError($attribute, 'Not valid Aadhar Card Number');
        }
    }
}
大家好,在這篇文章中,我只是分享了我在 YII2 面試中面試官最常問的問題的經驗。
- 什麼是 Active Record? 我們如何使用它?
- 什麼是 Components?
- 什麼是 Helpers Functions?
- 如何更新資料模型?
- Authentication 和 Authorization 之間的差異?
- 如何加速網站?
- 什麼是 GII?或者您是否使用 GII 模組?
- YII 和 YII2 之間有什麼差異?
- 如何使用多個資料庫?
- 如何將主題整合到網站中?
- 什麼是 OOPS?
- php 中的 final class 是什麼?
- 什麼是 abstract class?
- 什麼是 inheritance?
- 什麼是 Interface?
- 您是否具備 Javascript 和 Jquery 的知識?
- 什麼是 trait?
- 什麼是 Bootstrapping?
- YII2 的 advanced 和 basic 之間有什麼差異?
- 如何將 YII2 用作微框架?
- 什麼是 REST API? 如何在 YII2 中撰寫?
- YII2 專案的目錄結構?
- render、renderFile、renderPartial、renderAjax、renderContent 之間有什麼差異?
這些是面試官在您參加面試時可能問到您最常見的問題。
如果有人有其他問題,請在評論中分享!!!!
]]>- Gmail 不會解除封鎖您的網域... 感謝 Google
- 無論如何,如何發送電子郵件到 @gmail.com 信箱?
- 1. 設定一個輔助 @gmail.com 帳戶
- 2. 在您的設定檔中新增自訂組件
- 3. 新增輔助函數
- 4. 用法
- 5. 了解限制
- 6. Gmail 不是您的朋友
我的 網站 之一被垃圾郵件機器人淹沒,結果 - Gmail 給了我的郵件網域一個不良評分,我再也無法從我的電子郵件、我的系統、我託管的任何其他網域和網站發送電子郵件到 @gmail 地址...
Gmail 不會解除封鎖您的網域... 感謝 Google 
我確實從我的網站之一中移除了所有垃圾郵件機器人活動,並透過 Gmail 支援論壇對該決定提出申訴,但是,我仍然無法聯絡在 @gmail.com 擁有信箱的客戶,而且似乎沒有辦法將網域評分改回原來的樣子。
已經快 2 週了,我的網域評分仍然停留在 https://postmaster.google.com/ 中的不良狀態
感謝 @Google :(
無論如何,如何發送電子郵件到 @gmail.com 信箱? 
因此,我不得不找出發送購買、過期許可證和其他通知給客戶的方法。
我正在使用 PHP Yii2 框架,結果證明這很容易。
1. 設定一個輔助 @gmail.com 帳戶 
我們需要一個 @gmail.com 帳戶來發送通知。 有一件事很重要。 在您建立帳戶後,您需要啟用安全性較低的應用程式存取權選項

這允許我們透過 Gmail SMTP 伺服器發送電子郵件。
2. 在您的設定檔中新增自訂組件 
在您的 Yii2 框架目錄中,修改您的設定檔 /common/config/Main.php(我正在使用 Advanced Theme)並包含自訂郵件組件(隨您命名)
<?php
return [
	'vendorPath' => dirname(dirname(__DIR__)) . '/vendor',

	...

	'components' => [

		'mailerGmail' => [
			'class' => 'yii\swiftmailer\Mailer',
			'viewPath' => '@common/mail',
			'useFileTransport' => false,

			'transport' => [
				'class' => 'Swift_SmtpTransport',
				'host' => 'smtp.gmail.com',
				'username' => 'gmail.helper.account',
				'password' => 'PUT-YOUR-PASSWORD-HERE',
				'port' => '587',
				'encryption' => 'tls',
			],
		],
    ],
];
3. 新增輔助函數 
我已將輔助函數新增到我的組件之一,該組件註冊為 Yii::$app->Custom。 它會根據傳遞電子郵件的網域名稱傳回預設的郵件程式執行個體。
我也更新了程式碼以偵測電子郵件不包含 @gmail.com 字串,但仍然使用 Gmail MX 伺服器來處理電子郵件的情況。
偵測是根據使用 PHP 內建函數 getmxrr() 檢查網域郵件伺服器記錄,如果失敗,我會發送遠端 GET 查詢到 Google DNS 服務 API 以檢查 MX 記錄。
////////////////////////////////////////////////////////////////////////////////
//
// get default mailer depending on the provided email address
//
////////////////////////////////////////////////////////////////////////////////

public function getMailer($email)
{
	// detect if the email or domain is using Gmail to send emails
	if (Yii::$app->params['forwardGmail'])
	{
		// detect @gmail.com domain first
		if (str_ends_with($email, "@gmail.com"))
		{
			return Yii::$app->mailerGmail;
		}

		// extract domain name
		$parts = explode('@', $email);
		$domain = array_pop($parts);

		// check DNS using local server requests to DNS
		// if it fails query Google DNS service API (might have limits)
		if (getmxrr($domain, $mx_records))
		{
			foreach($mx_records as $record)
			{
				if (stripos($record, "google.com") !== false || stripos($record, "googlemail.com") !== false)
				{
					return Yii::$app->mailerGmail;
				}
			}

			// return default mailer (if there were records detected but NOT google)
			return Yii::$app->mailer;
		}

		// make DNS request
		$client = new Client();

		$response = $client->createRequest()
			->setMethod('GET')
			->setUrl('https://dns.google.com/resolve')
			->setData(['name' => $domain, 'type' => 'MX'])
			->setOptions([
				'timeout' => 5, // set timeout to 5 seconds for the case server is not responding
			])
			->send();

		if ($response->isOk)
		{
			$parser = new JsonParser();

			$data = $parser->parse($response);

			if ($data && array_key_exists("Answer", $data))
			{
				foreach ($data["Answer"] as $key => $value)
				{
					if (array_key_exists("name", $value) && array_key_exists("data", $value))
					{
						if (stripos($value["name"], $domain) !== false)
						{
							if (stripos($value["data"], "google.com") !== false || stripos($value["data"], "googlemail.com") !== false)
							{
								return Yii::$app->mailerGmail;
							}
						}
					}
				}
			}
		}
	}

	// return default mailer
	return Yii::$app->mailer;
}
如果網域以 @gmail.com 結尾,或者網域正在使用 Gmail 郵件系統,則會使用 mailerGmail 執行個體,否則會使用預設的郵件組件 Yii::$app->mailer。
4. 用法 
    /**
     * Sends an email to the specified email address using the information collected by this model.
     *
     * @return boolean whether the email was sent
     */
    public function sendEmail()
    {
		// find all active subscribers
		$message = Yii::$app->Custom->getMailer($this->email)->compose();

		$message->setTo([$this->email => $this->name]);
		$message->setFrom([\Yii::$app->params['supportEmail'] => "Bartosz Wójcik"]);
		$message->setSubject($this->subject);
		$message->setTextBody($this->body);

		$headers = $message->getSwiftMessage()->getHeaders();

		// message ID header (hide admin panel)
		$msgId = $headers->get('Message-ID');
		$msgId->setId(md5(time()) . '@pelock.com');

		$result = $message->send();

		return $result;
    }
5. 了解限制 
這只是暫時的解決方案,您需要注意,您將無法使用此方法發送大量郵件,Gmail 也對新的信箱強制執行了一些限制。
6. Gmail 不是您的朋友 
似乎如果您的網域落在不良聲譽範圍內,就沒有簡單的方法可以擺脫它。 我在 Gmail 支援論壇上看到,有些人等待超過一個月讓 Gmail 解鎖他們的網域,但沒有任何結果和回覆。 我的網域未列在任何其他封鎖的 RBL 列表(垃圾郵件列表)中,只有 Gmail 封鎖它,但這足以了解 Google 的影響力有多大,它可能會在瞬間毀掉您的業務,而且沒有機會修復它...
]]>如何實作 JWT 
JWT 概念 
JWT 是 JSON Web Token 的縮寫。 它用於取代工作階段,以在與 API 通訊的瀏覽器中維護登入狀態 - 因為瀏覽器工作階段容易受到 CSRF 安全性問題的攻擊。 JWT 也比設定 OAuth 身份驗證機制更簡單。
該概念依賴於兩個 token
- AccessToken - 短期有效的 JWT(例如 5 分鐘)
此 token 是使用 \sizeg\jwt\Jwt::class 產生的。 它未儲存在伺服器端,並透過 Authorization 標頭在所有後續 API 請求中傳送。 那麼如何識別使用者? 嗯,JWT 內容包含使用者 ID。 我們盲目信任此值。
- RefreshToken - 長期有效,儲存在資料庫中
此 token 僅在登入時產生,並儲存在 user_refresh_token 表格中。 一個使用者在資料庫中可能有多個 RefreshToken。
情境 
使用者第一次透過 /auth/login 端點登入: 
在我們的 actionLogin() 方法中,如果憑證正確,則會發生兩件事
- JWT AccessToken 會產生並透過 JSON 送回。 它未儲存在伺服器端的任何位置,並且包含使用者 ID(已編碼)。
- RefreshToken 會產生並儲存在資料庫中。 它不會以 JSON 形式送回,而是以
httpOnlycookie 形式送回,並限制在/auth/refresh-token路徑。
JWT 儲存在瀏覽器的 localStorage 中,並且必須從現在開始在所有請求中傳送。 RefreshToken 位於您的 cookie 中,但無法透過 Javascript 讀取/存取/竄改(因為它是 httpOnly)。
Token 已過期: 
一段時間後,JWT 最終會過期。 您的 API 在這種情況下必須傳回 401 - Unauthorized。 在您的應用程式 HTTP 用戶端(例如 Axios)中,新增一個攔截器,該攔截器會偵測 401 狀態、將失敗的請求儲存在佇列中,並呼叫 /auth/refresh-token 端點。
呼叫時,此端點將透過 cookie 接收 RefreshToken。 然後您必須在您的表格中檢查這是否是有效的 RefreshToken、關聯的使用者 ID 是誰、產生新的 JWT 並以 JSON 形式送回。
您的 HTTP 用戶端必須取得這個新的 JWT、將其替換為 localStorage,然後循環瀏覽請求佇列並重新播放所有失敗的請求。
我的筆記型電腦被偷了: 
如果您設定了 /auth/sessions 端點,該端點會傳回所有目前使用者的 RefreshToken,那麼您可以顯示所有連線裝置的表格。
然後您可以允許使用者移除列(即從表格中 DELETE 特定 RefreshToken)。 當受入侵的 token 過期(例如 5 分鐘後)並且嘗試續訂時,它將會失敗。 這就是為什麼我們希望 JWT 的生命週期非常短。
為什麼我們要盲目信任 JWT? 
這正是 JWT 的設計目的。 它足夠安全,值得信賴。 在大型設定(例如 Google)中,身份驗證由單獨的身份驗證伺服器處理。 它負責接受登入名/密碼以換取 token。
稍後,例如在 Gmail 中,根本不執行任何身份驗證。 Google 會讀取您的 JWT 並讓您存取您的電子郵件,前提是您的 JWT 沒有失效。 如果失效,您將被重新導向到身份驗證伺服器。
這就是為什麼當 Google 身份驗證在不久前發生故障時 - 有些使用者能夠毫無問題地使用 Gmail,而另一些使用者則完全無法連線 - JWT 仍然有效與過期的 JWT。
實作步驟 
先決條件 
- 已安裝 Yii2
- HttpOnly cookie 跨網站運作需要啟用
https的網站 - 用於儲存 RefreshToken 的資料庫表格
CREATE TABLE `user_refresh_tokens` (
	`user_refresh_tokenID` INT(10) UNSIGNED NOT NULL AUTO_INCREMENT,
	`urf_userID` INT(10) UNSIGNED NOT NULL,
	`urf_token` VARCHAR(1000) NOT NULL,
	`urf_ip` VARCHAR(50) NOT NULL,
	`urf_user_agent` VARCHAR(1000) NOT NULL,
	`urf_created` DATETIME NOT NULL COMMENT 'UTC',
	PRIMARY KEY (`user_refresh_tokenID`)
)
COMMENT='For JWT authentication process';
- 安裝套件:
composer require sizeg/yii2-jwt - 對於路由登入/登出/重新整理等,我們將使用名為
AuthController.php的控制器。 您可以隨意命名。
逐步設定 
為表格
user_refresh_tokens建立 ActiveRecord 模型。 我們將使用類別名稱app\models\UserRefreshToken。在您的所有控制器上停用 CSRF 驗證
新增此屬性: public $enableCsrfValidation = false;
- 在
/config/params.php中新增 JWT 參數
'jwt' => [
	'issuer' => 'https://api.example.com',  //name of your project (for information only)
	'audience' => 'https://frontend.example.com',  //description of the audience, eg. the website using the authentication (for info only)
	'id' => 'UNIQUE-JWT-IDENTIFIER',  //a unique identifier for the JWT, typically a random string
	'expire' => 300,  //the short-lived JWT token is here set to expire after 5 min.
],
- 在
/components中新增JwtValidationData類別,該類別使用我們剛設定的參數
<?php
namespace app\components;

use Yii;

class JwtValidationData extends \sizeg\jwt\JwtValidationData {
	/**
	 * @inheritdoc
	 */
	public function init() {
		$jwtParams = Yii::$app->params['jwt'];
		$this->validationData->setIssuer($jwtParams['issuer']);
		$this->validationData->setAudience($jwtParams['audience']);
		$this->validationData->setId($jwtParams['id']);

		parent::init();
	}
}
- 在
/config/web.php中的設定中新增組件,以初始化 JWT 身份驗證
	$config = [
		'components' => [
			...
			'jwt' => [
				'class' => \sizeg\jwt\Jwt::class,
				'key' => 'SECRET-KEY',  //typically a long random string
				'jwtValidationData' => \app\components\JwtValidationData::class,
			],
			...
		],
	];
- 將驗證器行為新增到您的控制器
- 對於
AuthController.php,我們必須排除不需要經過身份驗證的操作,例如login、refresh-token、options(當瀏覽器發送跨網站 OPTIONS 請求時)。
- 對於
	public function behaviors() {
    	$behaviors = parent::behaviors();

		$behaviors['authenticator'] = [
			'class' => \sizeg\jwt\JwtHttpBearerAuth::class,
			'except' => [
				'login',
				'refresh-token',
				'options',
			],
		];

		return $behaviors;
	}
- 將方法
generateJwt()和generateRefreshToken()新增到AuthController.php。 我們將在登入/重新整理 token 操作中使用它們。 如果您的使用者模型類別名稱不同,請調整類別名稱。
	private function generateJwt(\app\models\User $user) {
		$jwt = Yii::$app->jwt;
		$signer = $jwt->getSigner('HS256');
		$key = $jwt->getKey();
		$time = time();

		$jwtParams = Yii::$app->params['jwt'];

		return $jwt->getBuilder()
			->issuedBy($jwtParams['issuer'])
			->permittedFor($jwtParams['audience'])
			->identifiedBy($jwtParams['id'], true)
			->issuedAt($time)
			->expiresAt($time + $jwtParams['expire'])
			->withClaim('uid', $user->userID)
			->getToken($signer, $key);
	}

	/**
	 * @throws yii\base\Exception
	 */
	private function generateRefreshToken(\app\models\User $user, \app\models\User $impersonator = null): \app\models\UserRefreshToken {
		$refreshToken = Yii::$app->security->generateRandomString(200);

		// TODO: Don't always regenerate - you could reuse existing one if user already has one with same IP and user agent
		$userRefreshToken = new \app\models\UserRefreshToken([
			'urf_userID' => $user->id,
			'urf_token' => $refreshToken,
			'urf_ip' => Yii::$app->request->userIP,
			'urf_user_agent' => Yii::$app->request->userAgent,
			'urf_created' => gmdate('Y-m-d H:i:s'),
		]);
		if (!$userRefreshToken->save()) {
			throw new \yii\web\ServerErrorHttpException('Failed to save the refresh token: '. $userRefreshToken->getErrorSummary(true));
		}

		// Send the refresh-token to the user in a HttpOnly cookie that Javascript can never read and that's limited by path
		Yii::$app->response->cookies->add(new \yii\web\Cookie([
			'name' => 'refresh-token',
			'value' => $refreshToken,
			'httpOnly' => true,
			'sameSite' => 'none',
			'secure' => true,
			'path' => '/v1/auth/refresh-token',  //endpoint URI for renewing the JWT token using this refresh-token, or deleting refresh-token
		]));

		return $userRefreshToken;
	}
- 將登入操作新增到
AuthController.php
	public function actionLogin() {
		$model = new \app\models\LoginForm();
		if ($model->load(Yii::$app->request->getBodyParams()) && $model->login()) {
			$user = Yii::$app->user->identity;

			$token = $this->generateJwt($user);

			$this->generateRefreshToken($user);

			return [
				'user' => $user,
				'token' => (string) $token,
			];
		} else {
			return $model->getFirstErrors();
		}
	}
- 將重新整理 token 操作新增到
AuthController.php。 當 JWT 過期時呼叫POST /auth/refresh-token,當使用者請求登出時呼叫DELETE /auth/refresh-token(然後從用戶端的localStorage中刪除 JWT token)。
	public function actionRefreshToken() {
		$refreshToken = Yii::$app->request->cookies->getValue('refresh-token', false);
		if (!$refreshToken) {
			return new \yii\web\UnauthorizedHttpException('No refresh token found.');
		}

		$userRefreshToken = \app\models\UserRefreshToken::findOne(['urf_token' => $refreshToken]);

		if (Yii::$app->request->getMethod() == 'POST') {
			// Getting new JWT after it has expired
			if (!$userRefreshToken) {
				return new \yii\web\UnauthorizedHttpException('The refresh token no longer exists.');
			}

			$user = \app\models\User::find()  //adapt this to your needs
				->where(['userID' => $userRefreshToken->urf_userID])
				->andWhere(['not', ['usr_status' => 'inactive']])
				->one();
			if (!$user) {
				$userRefreshToken->delete();
				return new \yii\web\UnauthorizedHttpException('The user is inactive.');
			}

			$token = $this->generateJwt($user);

			return [
				'status' => 'ok',
				'token' => (string) $token,
			];

		} elseif (Yii::$app->request->getMethod() == 'DELETE') {
			// Logging out
			if ($userRefreshToken && !$userRefreshToken->delete()) {
				return new \yii\web\ServerErrorHttpException('Failed to delete the refresh token.');
			}

			return ['status' => 'ok'];
		} else {
			return new \yii\web\UnauthorizedHttpException('The user is inactive.');
		}
	}
- 調整使用者模型中的
findIdentityByAccessToken(),以透過 JWT 中的 uid 宣告尋找已驗證的使用者
	public static function findIdentityByAccessToken($token, $type = null) {
		return static::find()
			->where(['userID' => (string) $token->getClaim('uid') ])
			->andWhere(['<>', 'usr_status', 'inactive'])  //adapt this to your needs
			->one();
	}
- 另請記住在變更密碼時清除使用者的所有 RefreshToken,例如在使用者模型中的
afterSave()中
	public function afterSave($isInsert, $changedOldAttributes) {
		// Purge the user tokens when the password is changed
		if (array_key_exists('usr_password', $changedOldAttributes)) {
			\app\models\UserRefreshToken::deleteAll(['urf_userID' => $this->userID]);
		}

		return parent::afterSave($isInsert, $changedOldAttributes);
	}
- 建立一個頁面,使用者可以在其中刪除他的 RefreshToken。 列出屬於給定使用者的
user_refresh_tokens中的記錄,並允許他刪除他選擇的記錄。
用戶端範例 
Axios 攔截器(使用 React Redux???)
let isRefreshing = false;
let refreshSubscribers: QueuedApiCall[] = [];
const subscribeTokenRefresh = (cb: QueuedApiCall) =>
  refreshSubscribers.push(cb);

const onRefreshed = (token: string) => {
  console.log("refreshing ", refreshSubscribers.length, " subscribers");
  refreshSubscribers.map(cb => cb(token));
  refreshSubscribers = [];
};

api.interceptors.response.use(undefined,
  error => {
    const status = error.response ? error.response.status : false;
    const originalRequest = error.config;

    if (error.config.url === '/auth/refresh-token') {
      console.log('REDIRECT TO LOGIN');
      store.dispatch("logout").then(() => {
          isRefreshing = false;
      });
    }

    if (status === API_STATUS_UNAUTHORIZED) {


      if (!isRefreshing) {
        isRefreshing = true;
        console.log('dispatching refresh');
        store.dispatch("refreshToken").then(newToken => {
          isRefreshing = false;
          onRefreshed(newToken);
        }).catch(() => {
          isRefreshing = false;
        });
      }

      return new Promise(resolve => {
        subscribeTokenRefresh(token => {
          // replace the expired token and retry
          originalRequest.headers["Authorization"] = "Bearer " + token;
          resolve(axios(originalRequest));
        });
      });
    }
    return Promise.reject(error);


  }
);
感謝 Mehdi Achour 協助提供本教學的大部分材料。
]]>- 我的文章
- 切換語言和 URL 中的語言
- 搜尋和取代
- 虛擬化 - Vagrant 和 Docker - 為什麼以及如何
- 在 Vagrant 中執行 Yii 專案。 (簡化版本)
- 在 Docker 中執行 Yii 專案(更新:下方新增了 xDebug!)
- 在 Docker 中啟用 xDebug,yii 示範應用程式
- Docker - 自訂 php.ini
- 如何進入 Docker 的 bash (cli, 命令列)
- AdminLTE - 概述和主題的一般研究
- 建立自訂 Widget
- 測試 - 單元 + 功能 + 驗收 (opa) + 覆蓋率
- Microsoft Access MDB
- Migration 批次插入 csv
我的文章 
文章被分成更多檔案,因為 wiki 上每個檔案都有最大長度限制。
- Yii v1 入門
- Yii v1 入門 2
- Yii v2 代码片段指南 I
- Yii v2 代码片段指南 II
- Yii v2 代码片段指南 III
- Začínáme s PHP frameworkem Yii2 (I) česky - YouTube
切換語言和 URL 中的語言 
我已經 撰寫了 翻譯如何運作。 在這裡,我將展示如何切換語言並將其儲存到 URL 中。 因此,讓我們將語言切換器新增到主選單中
echo Nav::widget([
 'options' => ['class' => 'navbar-nav navbar-right'],
 'items' => [
  ['label' => 'Language', 'items' => [
    ['label' => 'German' , 'url' => \yii\helpers\Url::current(['sys_lang' => 'de']) ],
    ['label' => 'English', 'url' => \yii\helpers\Url::current(['sys_lang' => 'en']) ],
   ],
  ]
現在我們需要處理新的 GET 參數「sys_lang」並將其儲存到 Session 中,以便保留新語言。 最好是建立一個 BaseController,所有控制器都將擴充它。 其內容如下所示
<?php
namespace app\controllers;
use yii\web\Controller;
class _BaseController extends Controller {
  public function beforeAction($action) {
    if (isset($_GET['sys_lang'])) {
      switch ($_GET['sys_lang']) {
        case 'de':
          $_SESSION['sys_lang'] = 'de-DE';
          break;
        case 'en':
          $_SESSION['sys_lang'] = 'en-US';
          break;
      }
    }
    if (!isset($_SESSION['sys_lang'])) {
      $_SESSION['sys_lang'] = \Yii::$app->sourceLanguage;
    }
    \Yii::$app->language = $_SESSION['sys_lang'];
    return true;
  }
}
如果您想要在 URL 中使用 sys_lang,就在網域名稱後面,可以在 config/web.php 中建立以下 URL 規則
'components' => [
 // ...
 'urlManager' => [
  'enablePrettyUrl' => true,
  'showScriptName' => false,
  'rules' => [
   // https://yii.dev.org.tw/doc/api/2.0/yii-web-urlmanager#$rules-detail
   // https://stackoverflow.com/questions/2574181/yii-urlmanager-language-in-url
   // https://yii.dev.org.tw/wiki/294/seo-conform-multilingual-urls-language-selector-widget-i18n
   '<sys_lang:[a-z]{2}>' => 'site',
   '<sys_lang:[a-z]{2}>/<controller:\w+>' => '<controller>',
   '<sys_lang:[a-z]{2}>/<controller:\w+>/<action:\w+>' => '<controller>/<action>',
  ],
 ],
],
現在,語言切換連結將產生如下所示的 URL: http://myweb.com/en/site/index 。 如果沒有規則,連結將如下所示: http://myweb.com/site/index?sys_lang=en 。 因此,該規則在兩個方向上都有效。 當解析 URL 並呼叫控制器時,以及在使用 URL 輔助程式建立新 URL 時。
搜尋和取代 
我正在使用 Notepad++ 透過 Regex 進行大量變更。 如果您按下 Ctrl+Shift+F,您將能夠在所有檔案中取代。
Yii::t()
Yii::t('text'  ,  'text'   ) // NO
Yii::t('text','text') // YES

search: Yii::t\('([^']*)'[^']*'([^']*)'[^\)]*\)
replace with: Yii::t\('$1','$2'\)
URL (在 Notepad++ 中)
return $this->redirect('/controller/action')->send(); // NO
return $this->redirect(['controller/action'])->send(); // YES

search: ->redirect\(['][/]([^']*)[']\)
replace: ->redirect\(['$1']\)

====

return $this->redirect('controller/action')->send(); // NO
return $this->redirect(['controller/action'])->send(); // YES

search: ->redirect\((['][^']*['])\)
replace: ->redirect\([$1]\)
PHP 短標籤
search: (<\?)([^p=]) // <?if ...
replace: $1php $2 // <?php if ...
// note that sometimes <?xml can be found and it is valid, keep it
檢視用法
search: render(Ajax|Partial)?\s*\(\s*['"]\s*[a-z0-9_\/]*(viewName)
虛擬化 - Vagrant 和 Docker - 為什麼以及如何 
Vagrant 和 Docker 都使用您指定的幾乎任何 OS 或 SW 設定建立虛擬機器,而原始程式碼位於您的本機磁碟上,因此您可以輕鬆地在您的 OS 下的 IDE 中修改它們。
不僅可以用於 PHP 開發,也可用於任何其他情況。
這有什麼好處? ... 您的生產伺服器執行特定的環境,並且您想要在相同的系統上進行開發/測試。 此外,您不必在本機安裝 XAMPP、LAMP 或其他伺服器。 您只需啟動虛擬機器即可。 此外,您可以與其他同事共用虛擬系統的設定,以便大家都在相同的環境中工作。 您也可以在本機執行許多不同的 OS 系統,並使用不同的 PHP 版本等。
Vagrant 和 Docker 的工作方式就像 composer 或 NPM。 它是一個可用的 OS 映像和其他 SW 的函式庫,您只需選擇一些組合即可。 整個設定在一個文字檔中定義,名為 Vagrantfile 或 docker-compose.yml,您只需要幾個命令即可執行它。 而且偵錯也沒有問題。
在 Vagrant 中執行 Yii 專案。 (簡化版本) 
資訊:本章適用於 ScotchBox 中的 PHP 7.0。 如果您需要 PHP 7.4,請閱讀下一章,其中使用了 CognacBox(在測試後新增)
基本概述和 Vagrant 設定
所有可用的 Vagrant OS 映像列表都在這裡
Yii 示範應用程式都已包含 Vagrantfile,但其設定對我來說不清楚 - 它太過 PRO。 因此,我想發布我的簡化版本,該版本使用名為 scotch/box 的 OS 映像,您也可以將其用於非 yii PHP 專案。 (它有一些優點,缺點是免費版本中的 PHP 版本較舊)
Vagrantfile 儲存在您的示範專案的根資料夾中。 我的 Vagrantfile 僅包含以下命令。
Vagrant.configure("2") do |config|
    config.vm.box = "scotch/box"
    config.vm.network "private_network", ip: "11.22.33.44"
    config.vm.hostname = "scotchbox"
    config.vm.synced_folder ".", "/var/www/public", :mount_options => ["dmode=777", "fmode=777"]
    config.vm.provision "shell", path: "./vagrant/vagrant.sh", privileged: false
end

# Virtual machine will be available on IP A.B.C.D (in our case 11.22.33.44, see above)
# Virtual can access your host machine on IP A.B.C.1 (this rule is given by Vagrant)
它需要檔案 vagrant/vagrant.sh,因為我想稍微增強伺服器。 它包含以下內容
# Composer:
# (In case of composer errors, it can help to delete the vendor-folder and composer.lock file)
cd /var/www/public/
composer install

# You can automatically import your SQL (root/root, dbname scotchbox)
#mysql -u root -proot scotchbox < /var/www/public/vagrant/db.sql

# You can run migrations:
#php /var/www/public/protected/yiic.php migrate --interactive=0

# You can create folder and set 777 rights:
#mkdir /var/www/public/assets
#sudo chmod -R 777 /var/www/public/assets

# You can copy a file:
#cp /var/www/public/from.php /var/www/public/to.php

# Installing Xdebug v2 (Xdebug v3 has renamed config params!):
sudo apt-get update
sudo apt-get install php-xdebug

# Configuring Xdebug in php.ini:
# If things do not work, disable your firewall and restart IDE. It might help.
echo "" | sudo tee -a /etc/php/7.0/apache2/php.ini
echo "[XDebug]" | sudo tee -a /etc/php/7.0/apache2/php.ini
echo "xdebug.remote_enable=1" | sudo tee -a /etc/php/7.0/apache2/php.ini
echo "xdebug.remote_port=9000" | sudo tee -a /etc/php/7.0/apache2/php.ini
echo "xdebug.remote_autostart=1" | sudo tee -a /etc/php/7.0/apache2/php.ini
echo "xdebug.remote_log=/var/www/public/xdebug.log" | sudo tee -a /etc/php/7.0/apache2/php.ini
echo "xdebug.remote_connect_back=1" | sudo tee -a /etc/php/7.0/apache2/php.ini
echo "xdebug.idekey=netbeans-xdebug" | sudo tee -a /etc/php/7.0/apache2/php.ini

# Important: Make sure that your IDE has identical settings: idekey and remote_port.
# NetBeans: Make sure your project is correctly setup. Right-click the project and select Properties / Run Cofigurations. "Project URL" and "Index file" must have correct values.

# Note:
# Use this if remote_connect_back does not work.
# IP must correspond to the Vagrantfile, only the last number must be 1
#echo "xdebug.remote_handler=dbgp" | sudo tee -a /etc/php/7.0/apache2/php.ini
#echo "xdebug.remote_host=11.22.33.1" | sudo tee -a /etc/php/7.0/apache2/php.ini

sudo service apache2 restart
... 因此在您的專案中建立這兩個檔案 ...
如果您想手動開啟 php.ini 並貼上此文字,您可以從此處複製
// sudo nano /etc/php/7.0/apache2/php.ini
// (Xdebug v3 has renamed config params!)

[XDebug]
xdebug.remote_enable=1
xdebug.remote_port=9000
xdebug.remote_autostart=1
xdebug.remote_log=/var/www/public/xdebug.log
xdebug.remote_connect_back=1
xdebug.idekey=netbeans-xdebug

// Important: Make sure that your IDE has identical settings: idekey and remote_port.
// NetBeans: Make sure your project is correctly setup. Right-click the project and select Properties / Run Cofigurations. "Project URL" and "Index file" must have correct values.
若要在 PhpStorm 中進行偵錯,請查看 此影片。
若要透過 PhpStorm 連接到 MySQL,請查看 MilanG 的此評論
安裝和使用 Vagrant
請先安裝 Vagrant 和 VirtualBox。
注意:遺憾的是,這些天 VirtualBox 無法在基於 ARM 的配備 M1 晶片的 Mac 上運作。 在這種情況下請使用 Docker。
重要事項:如果命令「vagrant ssh」要求輸入密碼,請輸入「vagrant」。
- 安裝 Virtual Box,我建議也安裝「Extension Pack」,但可能會由「scotch/box」自動完成。
- 安裝 Vagrant ... 在 Windows 上需要重新啟動 :-(
- https://www.sitepoint.com/re-introducing-vagrant-right-way-start-php/
現在只需開啟您的命令列,導覽到您的專案,您就可以開始了
- 「vagrant -v」應該會顯示版本(如果一切正常)。
- 「vagrant init」會建立一個新專案(您現在不需要它)
- 「vagrant up」執行 Vagrantfile 並建立/啟動虛擬機器
虛擬機器執行後,您也可以呼叫這些
- 「vagrant ssh」開啟 Linux shell - 如果系統提示您輸入密碼,請使用密碼「vagrant」。
- 「vagrant halt」停止虛擬機器
- 「vagrant reload」重新啟動虛擬機器,並且不執行 config.vm.provision 或啟動現有的 VAGRANT 虛擬機器 - 您不必在每次重新啟動 PC 時都呼叫「vagrant up」
- 「vagrant reload --provision」重新啟動虛擬機器並執行 config.vm.provision
在 Linux shell 中,您可以呼叫任何您想要的命令。
- 若要尋找已安裝的 Linux 版本:「cat /etc/os-release」或「lsb_release -a」或「hostnamectl」
- 若要取得 PHP 版本,請呼叫:「php -version」
- 如果您不允許執行「mysql -v」,您可以執行「mysql -u {username} -p」.. 如果您知道登入資訊
- 目前 IP:hostname -I
在「scotch/box」中,我不使用 PhpMyAdmin,而是使用 Adminer。 它是一個簡單的 PHP 腳本,它可以在沒有任何安裝的情況下執行。 只需將 adminer.php 腳本複製到您的 docroot 並透過瀏覽器存取它即可。 使用與 Yii 設定中相同的登入資訊。 伺服器將是 localhost。
在 Docker 中執行 Yii 專案(更新:下方新增了 xDebug!) 
注意:我正在展示進階應用程式。 我認為基本應用程式不會有太大差異。 很棒的 Docker 教學 在這裡
Yii 專案已為 Docker 做好準備。 若要開始,您只需從 www.docker.com 安裝 Docker,然後就可以繼續閱讀本手冊。
- 下載應用程式範本並將其解壓縮到任何資料夾
- 開啟命令列並導覽到專案資料夾
- 執行命令 docker-compose up -d
- 參數 -d 將在背景以服務形式執行 docker
- 優點是命令列不會被封鎖 - 您可以呼叫更多命令
- 執行命令 init 以初始化應用程式
- 您也可以使用以下命令之一呼叫 composer install
- docker-compose run --rm frontend composer install
- docker-compose run --rm backend composer install
注意: init 和 composer 可以在本機呼叫,不一定要透過 Docker。 它們只會將檔案新增到您的資料夾。
現在您將能夠開啟 URL
- 前端: https://127.0.0.1:20080
- 後端: https://127.0.0.1:21080
- ... 請參閱 docker-compose.yml 以了解這些連接埠號碼
開啟 common/config/main-local.php 並設定以下 DB 連線
- host=mysql !!
- dbname=yii2advanced
- username=yii2advanced
- password=secret
- 值取自 docker-compose.yml
使用以下命令之一執行 migrations
- docker-compose run --rm frontend php yii migrate
- docker-compose run --rm backend php yii migrate
現在前往前端並點擊右上角的「註冊」
- 這將建立一個新使用者並發送電子郵件。 它將出現在資料夾 frontend/runtime/mail 中
- 現在您必須啟用它。 第一種方法是使用電子郵件
- 開啟 frontend/runtime/mail 中的 EML 檔案
- 複製內部的整個 href,並透過變更以下子字串來修改它:「=3D」、「=」、「&」、「%2F」
- 原始格式
- http://l=ocalhost:20080/index.php?r=3Dsite/verify-email&token=3D07tYL8tqNjsyr8=eZBoN_mXOgwtq1XqvB_1614901373
- 所需格式
- https://127.0.0.1:20080/index.php?r=site/verify-email&token=07tYL8tqNjsyr8eZBoN_mXOgwtq1XqvB_1614901373
- 如果連結正確,啟用將會成功
第二種方法是直接修改 DB 中的表格
- 下載 adminer - 它是一個單一檔案 DB 用戶端:www.adminer.org/en
- 將 Adminer 複製到 frontend\web\adminer.php
- 使用以下網址開啟 Adminer:https://127.0.0.1:20080/adminer.php
- 如果您的 DB 沒有密碼,adminer 填寫將拒絕工作。 您將必須「破解」它。
- 使用以下登入資訊並前往 DB yii2advanced
- 伺服器=mysql !!
- username=yii2advanced
- password=secret
- 值取自 docker-compose.yml
- 將 status=10 設定為您的第一個使用者
現在您有了您的帳戶,您可以登入後端
在 Docker 中啟用 xDebug,yii 示範應用程式 
只需將 environment 區段新增到 docker-compose.yml,如下所示
services:

  frontend:
    build: frontend
    ports:
      - 20080:80
    volumes:
      # Re-use local composer cache via host-volume
      - ~/.composer-docker/cache:/root/.composer/cache:delegated
      # Mount source-code for development
      - ./:/app
    environment:
      PHP_ENABLE_XDEBUG: 1
      XDEBUG_CONFIG: "client_port=9000 start_with_request=yes idekey=netbeans-xdebug log_level=1 log=/app/xdebug.log discover_client_host=1"
      XDEBUG_MODE: "develop,debug"
這將允許您看到格式良好的 var_dump 值,並在您的 IDE 中偵錯您的應用程式。
注意:您可以/必須根據您的 IDE 設定指定 idekey 和 client_port。 此外,您的 Yii 專案也必須在 IDE 中設定良好。 在 NetBeans 中,請確保「專案 URL」和「索引檔案」在「屬性/執行組態」(右鍵點擊專案)中是正確的
注意 2:請記住,xDebug2 和 xDebug3 具有不同的設定。 詳細資訊 在此。
我花了大約 8 個小時在這上面。 希望有人會喜歡它 :-) 可惜,此設定不存在於 docker-compose.yml 中。 這將非常方便。
Docker - 自訂 php.ini 
在「volumes」區段中新增此行
- ./myphp.ini:/usr/local/etc/php/conf.d/custom.ini
並在您的 Yii 應用程式的根目錄中建立檔案 myphp.ini。 您可以輸入例如 html_errors=on 和 html_errors=off 來測試檔案是否已載入。 重新啟動 docker 並使用 PHP 檔案中的方法 phpinfo() 檢查結果。
如何進入 Docker 的 bash (cli, 命令列) 
在命令列中導覽到您的 docker 專案的資料夾並執行命令
- docker ps
- 這將列出您在 docker-compose.yml 中定義的所有服務
列表的最後一欄是 NAMES。 選擇一個並複製其名稱。 然後執行命令
- docker exec -it {NAME} /bin/bash
- ... 其中 {NAME} 是您的服務名稱。 例如
- docker exec -it yii-advanced_backend_1 /bin/bash
若要找出使用的 Linux 版本,您可以呼叫 cat /etc/os-release。 (或查看 Vagrant 章節以取得其他命令)
如果您想找到 php.ini,請輸入 php --ini。 找到後,您可以將其複製到您的 yii 資料夾,如下所示
cp path/to/php.ini /app/myphp.ini
AdminLTE - 概述和主題的一般研究 
AdminLTE 是可用的管理主題之一。 它目前有 2 個版本
- AdminLTE v2 = 基於 Bootstrap 3 = 非常適合 Yii v2 應用程式
- AdminLTE v3 = 基於 Bootstrap 4(將 Yii2 從 Bootstrap3 升級到 Bootstrap4 * 很簡單)
* 將 Yii2 從 Bootstrap3 升級到 Bootstrap4: https://www.youtube.com/watch?v=W1xxvngjep8
AdminLTE <= 2.3、v2.4、v3.0 的文件 請注意,某些 AdminLTE 功能只是第三方依賴項。 例如地圖。
還有許多其他管理主題
- https://startbootstrap.com/theme/sb-admin-2 - 針對整合到 yii2 的優良教學位於 YouTube 上
- https://www.youtube.com/watch?v=CNQgmhjMhhM
- https://www.coderseden.com/product/material-dashboard-yii2
- 以及其他,請參閱 Google
還有更多 Yii2 擴充套件可用於將 AdminLTE 整合到 Yii 專案中
- https://yii.dev.org.tw/extension/insolita/yii2-adminlte-widgets
- http://adminlte.yiister.ru/site/boxes
- https://yii.dev.org.tw/extension/hail812/yii2-adminlte3 (composer 安裝失敗)
- https://yii.dev.org.tw/extension/yii2-adminlte-asset, git
- https://github.com/yidas/yii2-adminlte
- https://codeclimate.com/github/cjtterabytesoft/yii2-adminlte-basic/widgets/MainSidebar.php/source
我選擇了 AdminLTE v2 (因為它使用與 Yii2 範例相同的 Bootstrap),並且我測試了一些應有助於實作的擴充套件。
但讓我們從關於如何在 Yii2 範例應用程式中不使用擴充套件來使用 AdminLTE v2 的快速資訊開始。
v2.4 的手動整合 - 資源檔案 (Asset File) 建立
- 開啟 文件 並執行 composer 或下載 ZIP 中的所有相依性。
- 開啟 預覽頁面 並將整個 HTML 程式碼複製到您的文字編輯器。
- 刪除 BODY 區段中您不需要的部分 (至少是 class="content" 的 section 內容)
也刪除所有 SCRIPT 和 LINK 標籤。我們稍後將使用 AssetBundle 新增它們。
- 開啟現有的 views/layouts/main.php 檔案,並將重要的 PHP 呼叫複製到新檔案。(Asset, beginPage, $content, Breadcrumbs 等)
- 現在您的版面配置已完成,您可以取代原始的版面配置檔案。
我們只需要建立資源檔案 (Asset file) 以連結所有 SCRIPT 和 LINK。
- 將檔案 assets/AppAsset 複製到 assets/LteAsset 並重新命名裡面的類別。
- 將所有 LINK 和 SCRIPT URL 複製到 LteAsset。
- 跳過 jQuery 和 Bootstrap,它們是 Yii 的一部分。範例
namespace app\assets;
use yii\web\AssetBundle;
class LteAsset extends AssetBundle
{
    public $sourcePath = '@vendor/almasaeed2010/adminlte/';
    public $jsOptions = ['position' => \yii\web\View::POS_HEAD];  // POS_END cause conflict with YiiAsset
    public $css = [
        'bower_components/font-awesome/css/font-awesome.min.css',
        'https://fonts.googleapis.com/css?family=Source+Sans+Pro:300,400,600,700,300italic,400italic,600italic',
        // etc
    ];
    public $js = [
        'bower_components/jquery-ui/jquery-ui.min.js',
        // etc
    ];
    public $depends = [
        'yii\web\YiiAsset',
        'yii\bootstrap\BootstrapAsset',
    ];
}
- 重新整理您的 Yii 頁面並檢查「開發人員工具」中的網路錯誤。修正它們。
可能會出現此錯誤:「Headers already sent」(標頭已發送)
- 這表示您忘記將一些 PHP 程式碼從舊的版面配置檔案複製到新的版面配置檔案。
現在您已完成,您可以開始使用 AdminLTE 中的 HTML 和 JS 素材。那麼讓我們檢查一下將為我們完成此操作的擴充套件
Insolita 擴充套件
適用於許多 UI 項目:Boxes、Tile、Callout、Alerts 和 Chatbox。您只需要準備主要的版面配置檔案和資源包 (Asset bundle),請參閱上方說明。它自 2018 年以來就沒有更新過。
查看它的 網站 以查看我的評論。我展示了如何使用許多小工具 (widgets)。
原始碼中的瑕疵
vendor\insolita\yii2-adminlte-widgets\LteConst.php
- 有一個錯字:COLOR_LIGHT_BLUE 應該是 'lightblue',而不是 'light-blue'
vendor\insolita\yii2-adminlte-widgets\CollapseBox.php
- $collapseButtonTemplate 中的 Class 應該是 "btn btn-box-tool",而不是 "btn {btnType} btn-xs"
- (它會影響可展開方塊中的展開/摺疊按鈕)
- 必須修改 $collapseButtonTemplate 才能啟用從螢幕上移除方塊 (Boxes)。也就是說,必須在 method prepareBoxTools() 中變更 data-widget 和 iconClass
LteBox
- 方塊 (Boxes) 可以隱藏在「等待圖示」覆蓋層後面。這是透過在方塊 (box) 的 div 結尾使用以下 HTML 來完成的
<div class="overlay"><i class="fa fa-refresh fa-spin"></i></div> - 這必須手動新增或透過修改 LteBox 來新增
Yiister
它的網站解釋了一切。非常實用:http://adminlte.yiister.ru 您只需要本文中的資源檔案 (Asset File),然後安裝 Yiister 即可。可惜它自 2015 年以來就沒有更新過。提供用於呈現選單 (Menu)、GridView、少量方塊 (boxes)、Fleshalerts 和 Callouts 的小工具 (widgets)。以及錯誤頁面 (Error page)。
dmstr/yii2-adminlte-asset
在 AdminLTE 網站上正式提及。僅呈現選單 (Menu) 和 Alert。主要提供資源檔案 (Asset file) 和 Gii 範本。Gii 範本會自動修正 GridView 設計,但您可以在下方找到如何手動執行此操作。
其他增強功能
AdminLTE 正在使用字型 Source Sans Pro。如果您想要不同的字型,請在 Google Fonts 上選取它,並像這樣修改版面配置檔案
<link href="https://fonts.googleapis.com/css2?family=Palanquin+Dark:wght@400;500;600;700&display=swap" rel="stylesheet">
<style>
 body {
    font-family: 'Palanquin Dark', 'Helvetica Neue', Helvetica, Arial, sans-serif;
  }

  h1,h2,h3,h4,h5,h6,
  .h1,.h2,.h3,.h4,.h5,.h6 {
    font-family: 'Palanquin Dark', sans-serif;
  }
</style>
若要正確顯示 GridView,請將其包裝在此 HTML 程式碼中
<div class="box box-primary">
<div class="box-header">
<h3 class="box-title"><i class="fa fa-table"></i> Grid caption</h3>
</div>
<div class="box-body"
... grid view ...
</div>
</div>
您也可以變更 web/css/site.css 中的 glyphicon
a.asc:after {
    content: "\e155";
}

a.desc:after {
    content: "\e156";
}
這基本上就是全部了。現在我們知道如何使用 AdminLTE 並修正 GridView。至少需要一個擴充套件來呈現小工具 (widgets),請參閱上方說明。
建立自訂小工具 (Widget) 
請參閱關於 小工具 (Widgets) 的官方讀物或這個 說明。我正在介紹 這個範例,但我新增了 3 列。兩種小工具 (Widgets) 類型都可以像這樣編碼
namespace app\components;
use yii\base\Widget;
use yii\helpers\Html;

class HelloWidget extends Widget{
 public $message;
 public function init(){
  parent::init();
  if($this->message===null){
   $this->message= 'Welcome User';
  }else{
   $this->message= 'Welcome '.$this->message;
  }
  // ob_start();
  // ob_implicit_flush(false);
 }
 public function run(){
  // $content = ob_get_clean();
  return Html::encode($this->message); // . $content;
 }
}

// This widget is called like this:
echo HelloWidget::widget(['message' => ' Yii2.0']);

// After uncommenting my 4 comments you can use this
HelloWidget::begin(['message' => ' Yii2.0']);
echo 'My content';
HelloWidget::end();
測試 - 單元 + 功能 + 驗收 (opa) + 覆蓋率 
由於兩個範例應用程式都已準備就緒,因此可以輕鬆執行測試。使用命令列並導覽至您的專案。然後輸入
php ./vendor/bin/codecept run
這將執行單元測試和功能測試。它們定義在 tests/unit 和 tests/functional 資料夾中。我認為功能測試在隱藏的瀏覽器中執行,並且不適用於 JavaScript。為了測試複雜的 JavaScript,您需要驗收測試。如何在檔案 README.md 或兩個範例應用程式的 文件 中找到如何執行它們。如果您想在標準 Chrome 或 Firefox 瀏覽器中執行這些測試,您將需要 Java JDK 和檔案 selenium-server*.jar。請參閱 README.md 中的連結。取得 JAR 檔案後,將其放置到您的專案並執行它
java -jar selenium-server-4.0.0.jar standalone
現在您可以重新執行您的測試。請確保您在 acceptance.suite.yml 檔案的 WebDriver 區段中具有專案的運作 URL。例如 https://127.0.0.1/yii-basic/web。這取決於您的環境。也請指定瀏覽器。對我來說,設定 "browser: chrome" 效果很好。如果您收到錯誤「WebDriver is not installed」(未安裝 WebDriver),您需要呼叫此 composer 命令
composer require codeception/module-webdriver --dev
附註:還有這個檔案 ChromeDriver,但我不太確定它是否是 "codeception/module-webdriver" 的替代方案,或何時使用它。我尚未研究它。
如果您想查看程式碼覆蓋率,請執行文件中描述的操作 (上方連結)。此外,請確保您的 PHP 包含 xDebug!並注意 xDebug2 和 xDebug3 設定的差異!如果缺少 xDebug,您將收到錯誤「No code coverage driver available」(沒有可用的程式碼覆蓋率驅動程式)。
Microsoft Access MDB 
在 Linux 下我沒有成功,但當我在 Windows 上安裝 Web 伺服器 (例如 XAMPP Server) 時,我能夠安裝「Microsoft Access Database Engine 2016 Redistributable」並使用 *.mdb 檔案。
因此,首先您應該安裝具有 PHP 的 Web 伺服器,並且您應該知道您安裝的是 64 位元還是 32 位元版本。可能是 64 位元。然後前往 Microsoft Access Database Engine 2016 Redistributable 頁面 (或尋找更新的版本,如果有的話) 並安裝對應的套件 (32 位元或 64 位元)。
注意:如果您已經安裝了相同位元版本的 MS Access,您可能不需要安裝引擎。
然後您將能夠在 DB 連線中使用以下 DSN 字串。(程式碼屬於檔案 config/db.php)
<?php

$file = "C:\\xampp\\htdocs\\Database1.mdb";

return [
  'class' => 'yii\db\Connection',

  'dsn' => "odbc:DRIVER={Microsoft Access Driver (*.mdb, *.accdb)};Dbq=$file;Uid=;Pwd=;",
  'username' => '',
  'password' => '',
  'charset' => 'utf8',

  //'schemaMap' => [
  //  'odbc'=> [
  //    'class'=>'yii\db\pgsql\Schema',
  //    'defaultSchema' => 'public' //specify your schema here
  //  ]
  //],

  // Schema cache options (for production environment)
  //'enableSchemaCache' => true,
  //'schemaCacheDuration' => 60,
  //'schemaCache' => 'cache',
];
然後使用此程式碼查詢表格
$data = Yii::$app->db->createCommand("SELECT * FROM TableX")->queryAll();
var_dump($data);
注意:如果您已經安裝了與您的 PHP 位元版本不同的 MS Access,您將無法安裝正確位元版本的引擎。在這種情況下,您必須解除安裝 MS Access。
注意 2:如果您不知道您的 MDB 檔案包含什麼,Google Docs 向我推薦了 MDB, ACCDB Viewer and Reader,它運作良好。
注意 3:Windows 10 中有預先安裝的應用程式,名稱為
- 「ODBC Data Sources 32-bit」(ODBC 資料來源 32 位元)
- 「ODBC Data Sources 64-bit」(ODBC 資料來源 64 位元)
- (只需按下 Win 鍵並輸入「ODBC」)
開啟您需要的那個,前往「系統 DSN」標籤,然後按一下「新增」。您將看到可用的驅動程式 - 只有這些驅動程式可以用於 DSN 字串!!
如果只有「SQL Server」存在,那麼您需要安裝 Access Engine (或 MS Access) 以及適用於您平台的驅動程式。您需要名為 cca「Microsoft Access Driver (*.mdb, *.accdb)」的驅動程式
在我的情況下,引擎新增了以下 64 位元驅動程式
- Microsoft Access dBASE Driver (*.dbf, *.ndx, *.mdx)
- Microsoft Access Driver (*.mdb, *.accdb)
- Microsoft Access Text Driver (*.txt, *.csv)
- Microsoft Excel Driver (*.xls, *.xlsx, *.xlsm, *.xlsb)
那麼 Linux 呢?
您也需要 MS Access 驅動程式,但 Microsoft 不提供它們。有一些第三方 MdbTools 或 EasySoft,但它們要么不完美,要么價格昂貴。此外,還有 Unix ODBC。
對於 Java,有 Java JDBC、Jackcess 和 Ucanaccess。
那麼 Docker 呢? 據我所知,您無法在 Linux 下執行 Windows 映像,因此在這種情況下您將無法使用 Windows 的 ODBC 優勢。您可以在 Windows 下使用 Linux 映像,但我認為沒有辦法從虛擬 Linux 存取 ODBC 驅動程式。您必須嘗試一下,我尚未測試過。
遷移批次插入 CSV 
如果您想在 Yii2 遷移中將 CSV 匯入到您的 DB 中,您可以建立這個「遷移基底類別」並將其用作您實際遷移的父類別。然後您可以使用方法 batchInsertCsv()。
<?php

namespace app\components;

use yii\db\Migration;

class BaseMigration extends Migration
{
    /**
     * @param $filename Example: DIR_ROOT . DIRECTORY_SEPARATOR . "file.csv"
     * @param $table The target table name
     * @param $csvToSqlColMapping [csvColName => sqlColName] (if $containsHeaderRow = true) or [csvColIndex => sqlColName] (if $containsHeaderRow = false)
     * @param bool $containsHeaderRow If the header with CSV col names is present
     * @param int $batchSize How many rows will be inserted in each batch
     * @throws Exception
     */
    public function batchInsertCsv($filename, $table, $csvToSqlColMapping, $containsHeaderRow = false, $batchSize = 10000, $separator = ';')
    {
        if (!file_exists($filename)) {
            throw new \Exception("File " . $filename . " not found");
        }

        // If you see number 1 in first inserted row and column, most likely BOM causes this.
        // Some Textfiles begin with 239 187 191 (EF BB BF in hex)
        // bite order mark https://en.wikipedia.org/wiki/Byte_order_mark
        // Let's trim it on the first row.
        $bom = pack('H*', 'EFBBBF');

        $handle = fopen($filename, "r");
        $lineNumber = 1;
        $header = [];
        $rows = [];
        $sqlColNames = array_values($csvToSqlColMapping);
        $batch = 0;

        if ($containsHeaderRow) {
            if (($raw_string = fgets($handle)) !== false) {
                $header = str_getcsv(trim($raw_string, $bom), $separator);
            }
        }

        // Iterate over every line of the file
        while (($raw_string = fgets($handle)) !== false) {
            $dataArray = str_getcsv(trim($raw_string, $bom), $separator);

            if ($containsHeaderRow) {
                $dataArray = array_combine($header, $dataArray);
            }

            $tmp = [];
            foreach ($csvToSqlColMapping as $csvCol => $sqlCol) {
                $tmp[] = trim($dataArray[$csvCol]);
            }
            $rows[] = $tmp;

            $lineNumber++;
            $batch++;

            if ($batch >= $batchSize) {
                $this->batchInsert($table, $sqlColNames, $rows);
                $rows = [];
                $batch = 0;
            }
        }
        fclose($handle);

        $this->batchInsert($table, $sqlColNames, $rows);
    }
}
\yii\mail\BaseMailer::useFileTransport 是一個很棒的工具。如果您啟用它,透過此郵件程式傳送的所有電子郵件將會儲存 (預設情況下) 在 @runtime/mail 上,而不是被傳送出去,讓開發人員能夠檢查結果。
但是,如果我們想實際在我們的收件匣中接收電子郵件會發生什麼事?當所有電子郵件都應該發送到一個帳戶時,沒有問題:將其設定為參數,並在 params-local.php 中修改它 (假設是進階應用程式範本)。
當應用程式應該將電子郵件發送到不同的帳戶並使用 replyTo、cc 和 bcc 欄位時,就會出現大問題。幾乎不可能在不使用大量 if(YII_DEBUG) 的情況下,嘗試使用先前的方法來解決它。
好吧,接下來有一個解決方案
'useFileTransport' => true,
'fileTransportCallback' => function (\yii\mail\MailerInterface $mailer, \yii\mail\MessageInterface $message) {
    $message->attachContent(json_encode([
            'to' => $message->getTo(),
            'cc' => $message->getCc(),
            'bcc' => $message->getBcc(),
            'replyTo' => $message->getReplyTo(),
        ]), ['fileName' => 'metadata.json', 'contentType' => 'application/json'])
        ->setTo('debug@mydomain.com') // account to receive all the emails
        ->setCc(null)
        ->setBcc(null)
        ->setReplyTo(null);

    $mailer->useFileTransport = false;
    $mailer->send($message);
    $mailer->useFileTransport = true;

    return $mailer->generateMessageFileName();
}
它是如何運作的?fileTransportCallback 是指定應該用於在 @runtime/mail 上建立已儲存電子郵件的檔案名稱的回呼。它「攔截」了傳送電子郵件的程序,因此我們可以將其用於我們的目的。
- 附加一個 json 檔案,其中包含真實的收件者資訊,以便我們可以檢閱它
- 將收件者 (TO) 設定為我們想要接收所有電子郵件的電子郵件地址。
- 將其他收件者欄位設定為 null
- 停用
useFileTransport - 傳送電子郵件
- 啟用
useFileTransport - 傳回預設檔案名稱 (操作的日期時間)
這樣,我們既可以在指定的帳戶上接收所有電子郵件,又可以將它們儲存在 @runtime/mail 上。
在 Yii2 應用程式上檢閱電子郵件的非常簡單的助手。
最初發佈於:https://glpzzz.github.io/2020/10/02/yii2-redirect-all-emails.html
]]>在遇到許多錯誤且不知道如何在 yii2 中執行多個影像 API 之後,我今天終於成功了
這是我在論壇上提出的問題,它對我有效 https://forum.yiiframework.com/t/multiple-file-uploading-api-in-yii2/130519
在模型中實作此程式碼以進行 多檔案上傳
public function rules()
    {
        return [
            [['post_id', 'media'], 'required'],
            [['post_id'], 'integer'],
            [['media'], 'file', 'maxFiles' => 10],//here is my file field
            [['created_at'], 'string', 'max' => 25],
            [['post_id'], 'exist', 'skipOnError' => true, 'targetClass' => Post::className(), 'targetAttribute' => ['post_id' => 'id']],
        ];
    }
您也可以在模型中新增擴充功能或任何 skiponempty 方法。
這是我的控制器動作,我在其中執行了多檔案上傳程式碼。
public function actionMultiple(){
        $model = new Media;
        $model->post_id = '2';
        if (Yii::$app->request->ispost) {
            $model->media = UploadedFile::getInstances($model, 'media');
            if ($model->media) {
                foreach ($model->media as $value) {
                    $model = new Media;
                    $model->post_id = '2';
                    $BasePath = Yii::$app->basePath.'/../images/post_images';
                    $filename = time().'-'.$value->baseName.'.'.$value->extension;
                    $model->media = $filename;
                    if ($model->save()) {
                        $value->saveAs($BasePath.$filename);
                    }
                }
                return array('status' => true, 'message' => 'Image Saved');
            }
        }
        return array('status' => true, 'data' => $model);
    }
如果有任何疑問或問題,我會回覆。
]]>日誌記錄是應用程式非常重要的功能。它可以讓您知道每一刻正在發生的事情。預設情況下,Yii2 basic 和 advanced 應用程式只有一個 \yii\log\FileTarget 目標已設定。
若要接收來自應用程式的訊息電子郵件,請將日誌元件設定為電子郵件 (或 Telegram,或 slack) 傳輸,而不是 (或除了) 檔案傳輸
'components' => [
    // ...
    'log' => [
         'targets' => [
             [
                 'class' => 'yii\log\EmailTarget',
                 'mailer' => 'mailer',
                 'levels' => ['error', 'warning'],
                 'message' => [
                     'from' => ['log@example.com'],
                     'to' => ['developer1@example.com', 'developer2@example.com'],
                     'subject' => 'Log message',
                 ],
             ],
         ],
    ],
    // ...
],
\yii\log\EmailTarget 元件是記錄訊息的另一種方式,在這種情況下,透過應用程式的 mailer 元件將它們透過電子郵件傳送,如 EmailTarget 設定的 mailer 屬性中所指定。請注意,您也可以指定訊息屬性以及應透過此目標傳送的訊息層級。
如果您想要透過電子郵件以外的其他平台接收訊息,還有其他元件代表日誌目標
- Telegram: https://github.com/sergeymakinen/yii2-telegram-log
- Slack: https://github.com/sergeymakinen/yii2-slack-log
或者您可以透過子類別化 \yii\log\Target 來實作您自己的元件
]]>https://schema.org 是一個標記系統,允許在其網頁上嵌入結構化資料,以供搜尋引擎和其他應用程式使用。讓我們看看如何使用 JSON-LD 將 Schema.org 新增到我們基於 Yii2 的網站頁面。
基本上,我們需要做的是在我們的頁面中嵌入類似這樣的東西
<script type="application/ld+json">
{
  "@context": "http://schema.org/",
  "@type": "Movie",
  "name": "Avatar",
  "director":
    {
       "@type": "Person",
       "name": "James Cameron",
       "birthDate": "1954-08-16"
    },
  "genre": "Science fiction",
  "trailer": "../movies/avatar-theatrical-trailer.html"
}
</script>
但我們不喜歡在 Yii2 上編寫這樣的腳本,所以讓我們嘗試以其他更像 PHP 的方式來做。
在版面配置中,我們可以為我們的網站定義一些一般標記,因此我們在 @app/views/layouts/main.php 檔案的開頭新增以下程式碼片段
<?= \yii\helpers\Html::script(isset($this->params['schema'])
    ? $this->params['schema']
    : \yii\helpers\Json::encode([
        '@context' => 'https://schema.org',
        '@type' => 'WebSite',
        'name' => Yii::$app->name,
        'image' => $this->image,
        'url' => Yi::$app->homeUrl,
        'descriptions' => $this->description,
        'author' => [
            '@type' => 'Organization',
            'name' => Yii::$app->name,
            'url' => 'https://www.hogarencuba.com',
            'telephone' => '+5352381595',
        ]
    ]), [
    'type' => 'application/ld+json',
]) ?>
在這裡,我們使用 Html::script($content, $options) 來包含具有必要 type 選項的腳本,以及 Json::encode($value, $options) 來產生 JSON。此外,我們使用名為 schema 的頁面參數,以允許從其他頁面覆寫標記。例如,在 @app/views/real-estate/view.php 中,我們使用
$this->params['schema'] = \yii\helpers\Json::encode([
    '@context' => 'https://schema.org',
    '@type' => 'Product',
    'name' => $model->title,
    'description' => $model->description,
    'image' => array_map(function ($item) {
        return $item->url;
    }, $model->images),
    'category' => $model->type->description_es,
    'productID' => $model->code,
    'identifier' => $model->code,
    'sku' => $model->code,
    'url' => \yii\helpers\Url::current(),
    'brand' => [
        '@type' => 'Organization',
        'name' => Yii::$app->name,
        'url' => 'https://www.hogarencuba.com',
        'telephone' => '+5352381595',
    ],
    'offers' => [
        '@type' => 'Offer',
        'availability' => 'InStock',
        'url' => \yii\helpers\Url::current(),
        'priceCurrency' => 'CUC',
        'price' => $model->price,
        'priceValidUntil' => date('Y-m-d', strtotime(date("Y-m-d", time()) . " + 365 day")),
        'itemCondition' => 'https://schema.org/UsedCondition',
        'sku' => $model->code,
        'identifier' => $model->code,
        'image' => $model->images[0],
        'category' => $model->type->description_es,
        'offeredBy' => [
            '@type' => 'Organization',
            'name' => Yii::$app->name,
            'url' => 'https://www.hogarencuba.com',
            'telephone' => '+5352381595',
        ]
    ]
]);
在這裡,我們使用更複雜的標記重新定義此頁面的 schema:具有報價的產品。
透過這種方式,我們網站上的所有頁面都將定義 schema.org 標記:在版面配置中,我們有一個預設值,而在其他頁面中,我們可以透過在 $this->params['schema'] 上設定值來重新定義。
OpenGraph 和 Twitter Cards 是兩個元資料集,允許描述網頁,並使其更容易被 Facebook 和 Twitter 理解。
有很多 meta 標籤要新增到一個簡單的網頁,所以讓我們使用 TaggedView
此元件覆寫了 yii\web\View,為其新增了更多屬性,允許在每個視圖上設定值。通常我們使用以下程式碼設定頁面標題
$this->title = $model->title;
現在,使用 TaggedView,我們可以設定
$this->title = $model->title;
$this->description = $model->abstract;
$this->image = $model->image;
$this->keywords = ['foo', 'bar'];
這將為此頁面產生適當的 OpenGraph、Twitter Card 和 HTML meta description 標籤。
此外,我們可以在元件設定中為每個標籤定義預設值,這些預設值將適用於每個頁面,並且僅在像先前的範例中那樣重新定義時才被覆寫。
'components' => [
    //...
    'view' => [
        'class' => 'daxslab\taggedview\View',
        'site_name' => '',
        'author' => '',
        'locale' => '',
        'generator' => '',
        'updated_time' => '',
    ],
    //...
]
其中一些屬性已指派預設值,例如 site_name,預設情況下會取得 Yii::$app->name。
在網站上使用的結果
<title>¿Deseas comprar o vender una casa en Cuba? | HogarEnCuba, para comprar y vender casas en Cuba</title>
<meta name="author" content="Daxslab (https://www.daxslab.com)">
<meta name="description" content="Hay 580 casas...">
<meta name="generator" content="Yii2 PHP Framework (https://yii.dev.org.tw)">
<meta name="keywords" content="HogarEnCuba, ...">
<meta name="robots" content="follow">
<meta name="twitter:card" content="summary_large_image">
<meta name="twitter:description" content="Hay 580 casas...">
<meta name="twitter:image" content="https://www.hogarencuba.com/images/main-identifier_es.png">
<meta name="twitter:site" content="HogarEnCuba">
<meta name="twitter:title" content="¿Deseas comprar o vender una casa en Cuba?">
<meta name="twitter:type" content="website">
<meta name="twitter:url" content="https://www.hogarencuba.com/">
<meta property="og:description" content="Hay 580 casas...">
<meta property="og:image" content="https://www.hogarencuba.com/images/main-identifier_es.png">
<meta property="og:locale" content="es">
<meta property="og:site_name" content="HogarEnCuba">
<meta property="og:title" content="¿Deseas comprar o vender una casa en Cuba?">
<meta property="og:type" content="website">
<meta property="og:updated_time" content="10 sept. 2020 9:43:00">
- 我的文章
- 連線到 MSSQL
- 在 Yii2 專案中使用 MSSQL 資料庫作為第二個 DB
- 在 Gii 中為遠端 MSSQL 表格建立模型
- Yii 2 中的 PhpExcel/PhpSpreadsheet 以及將二進位內容傳送到瀏覽器
- PDF - UTF + 1D 和 2D 條碼 - TCPDF
- 自訂格式器 - asDecimalOrInteger
- 在具有父模型的 GridView 中顯示子模型的 SUM
- 依相關欄位排序和搜尋
- 將二進位資料作為檔案傳送到瀏覽器 - 解碼 base64
我的文章 
文章被分成更多檔案,因為 wiki 上每個檔案都有最大長度限制。
- Yii v1 入門
- Yii v1 入門 2
- Yii v2 代码片段指南 I
- Yii v2 代码片段指南 II
- Yii v2 代码片段指南 III
- Začínáme s PHP frameworkem Yii2 (I) česky - YouTube
連線到 MSSQL 
您將需要在 PHP 中安裝 MSSQL 驅動程式。您可以透過程式碼列出它們或測試它們是否存在,如下所示
var_dump(\PDO::getAvailableDrivers());

if (in_array('sqlsrv', \PDO::getAvailableDrivers())) {
  // ... MsSQL driver is available, do something
}
根據您的系統,您必須下載不同的驅動程式。差異在於 x64 與 x86 以及 ThreadSafe 與 nonThreadSafe。在 Windows 中,我總是使用 ThreadSafe。說明。
最新的 PHP 驅動程式 在此處。
- 驅動程式 v5.8 = PHP 7.2 - 7.4
較舊的 PHP 驅動程式 在此處。
- 驅動程式 v4.0 = PHP 7.0 - 7.1
- 驅動程式 v3.2 = PHP 5.x
驅動程式下載並解壓縮後,選取一個 DLL 檔案並將其放置到資料夾 "php/ext" 中。在 Windows 上,它可能位於此處:「C:\xampp\php\ext」
注意: 在某些情況下,您可能也需要 這些 OBDC 驅動程式,但我不確定何時需要
現在必須修改檔案 php.ini。在 Windows 上,它可能放置在此處:「C:\xampp\php\php.ini」。開啟它並搜尋以單字「extension」開頭的列,並在那裡貼上大約這個程式碼
extension={filename.dll}
// Example:
extension=php_pdo_sqlsrv_74_ts_x64.dll
現在重新啟動 Apache 並造訪 phpinfo() 網頁。您應該會看到區段「pdo_sqlsrv」。如果您使用的是 XAMPP,它可能位於此 URL 上:https://127.0.0.1/dashboard/phpinfo.php。
然後只需在 Yii2 設定中新增與 MSSQL DB 的連線。在我的情況下,資料庫是遠端的,因此我需要建立第二個 DB 連線。閱讀下一章節以了解如何執行此操作。
在 Yii2 專案中使用 MSSQL 資料庫作為第二個 DB 
在 yii-config 中新增第二個資料庫的做法如下
'db' => $db, // the original DB
'db2'=>[
  'class' => 'yii\db\Connection',
  'driverName' => 'sqlsrv',
  // I was not able to specify database like this:
  // 'dsn' => 'sqlsrv:Server={serverName};Database={dbName}',
  'dsn' => 'sqlsrv:Server={serverName}',
  'username' => '{username}',
  'password' => '{pwd}',
  'charset' => 'utf8',
],
就是這樣。現在您可以像這樣測試您的 DB
$result = Yii::$app->db2->createCommand('SELECT * FROM {tblname}')->queryAll();
var_dump($result);
請注意,在 MSSQL 中,您可以有更長的表格名稱。範例:CATEGORY.SCHEMA.TBL_NAME
您的第一個測試模型可以看起來像這樣 (檔案 MyMsModel.php)
namespace app\models;
use Yii;
use yii\helpers\ArrayHelper;
class MyMsModel extends \yii\db\ActiveRecord
{
  public static function getDb()
  {
    return \Yii::$app->db2; // or Yii::$app->get('db2');
  }
  public static function tableName()
  {
    return 'CATEGORY.SCHEMA.TBL_NAME'; // or SCHEMA.TBL_NAME
  }
}
用法
$result = MyMsModel::find()->limit(2)->all();
var_dump($result);
在 Gii 中為遠端 MSSQL 表格建立模型 
新增第二個資料庫後 (請閱讀上方說明),前往 Gii 中的模型產生器。在那裡將 DB 連線變更為您在 yii-config 中命名的連線 (在上面的範例中是 "db2"),並以格式設定表格名稱:SCHEMA.TBL_NAME。如果 MSSQL 伺服器有多個資料庫,其中一個將設定為主 DB。我認為這將會被使用。我沒有成功變更 DB。DB 可以在 DSN 字串中設定,但在我的情況下沒有效果。
Yii 2 中的 PhpExcel/PhpSpreadsheet 以及將二進位內容傳送到瀏覽器 
在先前的章節中,我展示了如何在 Yii 1 中使用 PhpExcel。現在我也在 Yii 2 中需要它,而且它非常容易。
注意:PhpExcel 已被棄用,並已由 PhpSpreadsheet 取代。
// 1) Command line:
// This downloads everything to folder "vendor"
composer require phpoffice/phpspreadsheet --prefer-source
// --prefer-source ... also documentation and samples are downloaded
// ... adds cca 40MB and 1400 files
// ... only for devel system

// 2) PHP:
// Now you can directly use the package without any configuration:
use PhpOffice\PhpSpreadsheet\Spreadsheet;
use PhpOffice\PhpSpreadsheet\Writer\Xlsx;

$spreadsheet = new Spreadsheet();
$sheet = $spreadsheet->getActiveSheet();

// Uncomment following rows if you want to set col width:
//$sheet->getColumnDimension('A')->setAutoSize(false);
//$sheet->getColumnDimension('A')->setWidth("50");

$sheet->setCellValue('A1', 'Hello World !');

$writer = new Xlsx($spreadsheet);

// You can save the file on the server:
// $writer->save('hello_world.xlsx');

// Or you can send the file directly to the browser so user can download it:
// header('Content-Type: application/vnd.ms-excel'); // This is probably for older XLS files.
header('Content-Type: application/application/vnd.openxmlformats-officedocument.spreadsheetml.sheet'); // This is for XLSX files (they are basically zip files).
header('Content-Disposition: attachment;filename="filename.xlsx"');
header('Cache-Control: max-age=0');
$writer->save('php://output');
exit();
感謝 DbCreator 提供的關於如何將 XLSX 傳送到瀏覽器的想法。儘管如此,不應該呼叫 exit() 或 die()。請閱讀連結。
以下是我的想法,它源自 Yii2 的 method renderPhpFile()
ob_start();
ob_implicit_flush(false);
$writer->save('php://output');
$file = ob_get_clean();

return \Yii::$app->response->sendContentAsFile($file, 'file.xlsx',[
  'mimeType' => 'application/application/vnd.openxmlformats-officedocument.spreadsheetml.sheet',
  'inline' => false
]);
這對我也有效
$tmpFileName = uniqid('file_').'.xlsx';
$writer->save($tmpFileName);
header('Content-Type: application/application/vnd.openxmlformats-officedocument.spreadsheetml.sheet');
header('Content-Disposition: attachment;filename="filename.xlsx"');
header('Cache-Control: max-age=0');
echo file_get_contents($tmpFileName);
unlink($tmpFileName);
exit();
注意:但不應該呼叫 exit() 或 die()。請閱讀上方的「DbCreator」連結。
PDF - UTF + 1D 和 2D 條碼 - TCPDF 
請參閱本指南的第一部分,了解其他 PDF 建立器
TCPDF 建立於 2002 年 (我認為),並且在今天 (2020 年) 正在被重寫為現代 PHP 應用程式。我將描述舊版本和新版本,但讓我們從舊版本開始。
舊版本的 TCPDF
從 GitHub 下載它並將其儲存到資料夾
{projectPath}/_tcpdf
在 web/index.php 中新增此程式碼
require_once('../_tcpdf/tcpdf.php');
現在您可以使用任何範例來測試 TCPDF。例如:https://tcpdf.org/examples/example_001/
注意: 您必須使用反斜線呼叫建構函式
$pdf = new \TCPDF(PDF_PAGE_ORIENTATION, PDF_UNIT, PDF_PAGE_FORMAT, true, 'UTF-8', false);
注意: 文字是使用更多方法列印的 - 請參閱檔案 tcpdf.php 以取得詳細資訊
- writeHTMLCell()
- Multicell()
- writeHTML()
- Write()
- Cell()
- Text()
注意: 以 UTF8 無 BOM 格式儲存您的檔案,以便變音符號在 PDF 中正確顯示。
匯入新的 TTF 字型是這樣完成的
// this command creates filed in folder _tcpdf\fonts. Use the filename as the fontname in other commands.
$fontname = \TCPDF_FONTS::addTTFfont("path to TTF file", 'TrueTypeUnicode', '', 96);
現在您可以在 PHP 中像這樣使用它
$pdf->SetFont($fontname, '', 24, '', true);
或在 HTML 中
<font size="9" face="fontName" style="color: rgb(128, 128, 128);">ABC</font>
呈現是這樣完成的
$pdf->writeHTML($html);
注意: 當將 pageNr 和 totalPageCount 列印到頁尾時,writeHTML() 無法正確解譯方法 getAliasNumPage() 和 getAliasNbPages(),如 範例 3 中所示。我必須使用呈現方法 Text() 並像這樣正確放置數字
$this->writeHTML($footerHtmlTable);
$this->SetTextColor('128'); // I have gray pageNr
$this->Text(185, 279, 'Page ' . $this->getAliasNumPage() . '/' . $this->getAliasNbPages());
$this->SetTextColor('0'); // returning black color
新版本的 TCPDF
... 待完成 ...
- https://github.com/tecnickcom/tc-lib-pdf
- composer require tecnickcom/tc-lib-pdf:dev-master
- use Com\Tecnick\Pdf\TCPDF;
- $pdf = new TCPDF();
自訂格式器 - asDecimalOrInteger 
如果我產生 PDF 發票,它包含許多數字,並且在不需要小數點時將它們列印為整數會很好。例如,數字 24 比 24.00 看起來更好,並且節省空間。所以我建立了一個這樣的格式器。原始靈感和操作指南在此處找到
我的格式器看起來像這樣
<?php

namespace app\myHelpers;

class MyFormatter extends \yii\i18n\Formatter {

  public function asDecimalOrInteger($value) {
    $intStr = (string) (int) $value; // 24.56 => "24" or 24 => "24"
    if ($intStr === (string) $value) {
      // If input was integer, we are comparing strings "24" and "24"
      return $this->asInteger($value);
    }
    if (( $intStr . '.00' === (string) $value)) {
      // If the input was decimal, but decimals were all zeros, it is an integer.
      return $this->asInteger($value);
    }
    // All other situations
    $decimal = $this->asDecimal($value);

    // Here I trim also the trailing zero.
    // Disadvantage is that String is returned, but in PDF it is not important
    return rtrim((string)$decimal, "0");
  }

}
用法很簡單。閱讀上面的連結並喜歡 karpy47,或參見下方
// file config/web.php
'components' => [
    'formatter' => [
        'class' => 'app\myHelpers\MyFormatter',
   ],
],
整個 Yii 中只有一個格式器,您可以擴充它 = 您可以新增更多方法,並且格式器的其餘部分將保留,因此您可以使用文件中提到的所有其他方法。
在具有父模型的 GridView 中顯示子模型的 SUM 
... 可以透過將 MySQL VIEW 新增到您的 DB 中、為其建立模型並在「ParentSearch」模型中將其用作基底類別來輕鬆完成。
讓我們在發票及其項目的清單上展示它。發票在表格 "invoice" (模型 Invoice) 中,其項目在 "invoice_item" (模型 InvoiceItem) 中。現在我們需要聯結它們,並依價格 (金額) 的 SUM 排序和篩選它們。為了避免在 PHP 中進行計算,如果我們準備 MySQL VIEW,DB 可以為我們完成此操作
CREATE VIEW v_invoice AS
SELECT invoice.*,
SUM(invoice_item.units * invoice_item.price_per_unit) as amount,
COUNT(invoice_item.id) as items
FROM invoice
LEFT JOIN invoice_item
ON (invoice.id = invoice_item.id_invoice)
GROUP BY invoice.id
注意: 在此處您可以閱讀為什麼最好不要在 LEFT JOIN 中使用 COUNT(*)
- https://learnsql.com/blog/introduction-using-aggregate-functions-joins/
- 章節:Dealing with NULLs (處理 NULL)
這將在技術上將原始表格 "invoice" 克隆到 "v_invoice" 中,並將附加 2 個計算欄位:「amount」+「items」。現在您可以輕鬆地將此 VIEW 用作 TABLE (僅用於讀取),並在 GridView 中顯示它。如果您已經有表格 "invoice" 的 GridView,則變更很小。建立此模型
<?php
namespace app\models;
class v_Invoice extends Invoice
{
    public static function primaryKey()
    {
        // here is specified which column(s) create the fictive primary key in the mysql-view
        return ['id'];
    }
    public static function tableName()
    {
        return 'v_invoice';
    }
}
.. 並在模型 InvoiceSearch 中將單字 Invoice 取代為 v_Invoice (我猜在 2 個地方),再加上為那些新欄位新增規則。範例
public function rules()
{
  return [
    // ...
    [['amount'], 'number'], // decimal
    [['items'], 'integer'],
  ];
}
如果您想要依金額或項目篩選,請在方法 search() 中新增條件
if (trim($this->amount)!=='') {
  $query->andFilterWhere([
    'amount' => $this->amount
  ]);
}
在 GridView 中,您現在可以使用欄位「amount」和「items」作為原生欄位。篩選和排序將會運作。
危險: 請閱讀下方關於如何依相關欄位搜尋和排序的說明。如果您想將您的 MySQL 與另一個表格聯結,這可能會停止運作。
我相信這種方法是達成目標的最簡單方法。優點是 MySQL VIEW 僅在呼叫 search() 方法時使用 - 這表示在發票清單中。網站的其他部分不受影響,因為它們使用原始的 Invoice 模型。但是,如果您需要 Invoice 模型中的某些特殊方法,您也可以在 v_Invoice 中找到它。如果資料已儲存或變更,您必須始終修改原始表格 "invoice"。
依相關欄位排序和搜尋 
假設您有發票表格和公司表格。它們具有關聯性,並且您想要顯示發票清單,以及每列對應的公司名稱。您想要依此欄位篩選和排序。
您的 GridView
<?= GridView::widget([
// ...
  'columns' => [
    // ...
    [
      'attribute'=>'company_name',
      'value'=>'companyRelation.name',
    ],
您的 InvoiceSearch 模型
class InvoiceSearch extends Invoice
{
  public $company_name;

  // ...

  public function rules() {
    return [
      // ...
      [['company_name'], 'safe'],
    ];
  }

  // ...

  public function search($params) {
    // ...

    // You must use joinWith() in order to have both tables in one JOIN - then you can call WHERE and ORDER BY on the 2nd table.
    // Explanation here:
    // https://stackoverflow.com/questions/25600048/what-is-the-difference-between-with-and-joinwith-in-yii2-and-when-to-use-them

    $query = Invoice::find()->joinWith('companyRelation');

    // Appending new sortable column:
    $sort = $dataProvider->getSort();
    $sort->attributes['company_name'] = [
      'asc' => ['table.column' => SORT_ASC],
      'desc' => ['table.column' => SORT_DESC],
      'label' => 'Some label',
      'default' => SORT_ASC
    ];

    // ...

    if (trim($this->company_name)!=='') {
      $query->andFilterWhere(['like', 'table.column', $this->company_name]);
    }
  }
將二進位資料作為檔案傳送到瀏覽器 - 解碼 base64 
在我的 Yii v1 教學中,我介紹了以下手動傳送標頭然後呼叫 exit() 的方法。但是呼叫 exit() 或 die() 不是一個好主意,所以我發現了 Yii v2 中更好的方法。請參閱章節 安全 (秘密) 檔案下載
動機:有時您會收到使用 base64 編碼為字串的 PDF 檔案。例如,來自 FedEx、DPD 或其他運輸公司的條碼標籤,而您的任務是向使用者顯示標籤。
對我來說,這個演算法有效
$pdfBase64 = 'JVBERi0xLjQ ... Y0CiUlRU9GCg==';

// First I create a fictive stream in a temporary file
// Read more about PHP wrappers:
// https://php.dev.org.tw/manual/en/wrappers.php.php
$stream = fopen('php://temp','r+');

// Decoded base64 is written into the stream
fwrite($stream, base64_decode($pdfBase64));

// And the stream is rewound back to the start so others can read it
rewind($stream);

// This row sets "Content-Type" header to none. Below I set it manually do application/pdf.
Yii::$app->response->format = Yii::$app->response::FORMAT_RAW;
Yii::$app->response->headers->set('Content-Type', 'application/pdf');

// This row will download the file. If you do not use the line, the file will be displayed in the browser.
// Details here:
// https://developer.mozilla.org/en-US/docs/Web/HTTP/Headers#Downloads
// Yii::$app->response->headers->set('Content-Disposition','attachment; filename="hello.pdf"');

// Here is used the temporary stream
Yii::$app->response->stream = $stream;

// You can call following line, but you don't have to. Method send() is called automatically when current action ends:
// Details here:
// https://yii.dev.org.tw/doc/api/2.0/yii-web-response#sendContentAsFile()-detail
// return Yii::$app->response->send();
注意: 如果您需要,可以新增更多標頭。請查看我先前的文章 (上方連結)。
]]>注意:Pantahub 是唯一可以共享 Linux 韌體並將其部署到任何裝置的地方。您可以在此處註冊 @pantahub:http://www.pantahub.com
依照 6 個步驟讓您的 RPI3 裝置準備好部署 Yii2 
步驟 1:將 RPI3 初始穩定映像燒錄到您的 sd 卡中。
a) 下載 RPI3 映像 
b) 解壓縮裝置映像 
執行 $ unxz rpi3_initial_stable.img.xz
c) 使用 Raspberry Pi Imager 1.2 將映像燒錄到 sd 卡中 

步驟 2:啟動您的 RPI3 
a) 插入您的 sd 卡並供電 

步驟 3:在此處註冊 @pantahub http://www.pantahub.com 
步驟 4:下載並安裝 CLI 工具 "pvr" 
注意: pvr 是一個 CLI 工具,可用於透過 pantahub 平台與您的裝置互動。
注意: 使用 pvr,您可以像使用 git 樹一樣簡單地共享您的韌體和專案。
注意: 下載後,將 pvr 二進位檔案移動到您的 bin 資料夾。
Linux(AMD64): 下載
Linux(ARM32v6): 下載
Darwin(AMD64): 下載
pvr clone; pvr commit; pvr post
從 github 原始碼安裝: $ go get gitlab.com/pantacor/pvr $ go build -o ~/bin/pvr gitlab.com/pantacor/pvr
注意: 您需要在您的系統中安裝 "GOLANG" 才能從 github 原始碼建置 pvr。
步驟 5:偵測和聲明您的裝置 
a) 在您的 RPI3 和電腦/路由器之間連接 LAN 纜線。

b) 開啟您的終端機並執行 $ pvr scan 

c) 聲明您的裝置 
$ pvr claim -c merely-regular-gorilla https://api.pantahub.com:443/devices/5f1b9c44e193a Watch now on Amazon Prime Video 5000afa9901

d) 登入 Panthub.com 並檢查新認領的裝置是否出現在儀表板中。 


步驟 6:使用您裝置的 Clone URL 將裝置複製到您的電腦 
$ pvr clone https://pvr.pantahub.com/sirinibin/presently_learning_pelican/0 presently_learning_pelican

現在您的裝置已準備好部署您的 Yii2 應用程式
依照 5 個步驟將您的 Yii2 應用程式部署到裝置 
步驟 1:移動到裝置根目錄 
`$ cd presently_learning_pelican`
步驟 2:將新的應用程式 "yii2" 新增到裝置中 
>sirinibin/yii2-basic-arm32v7:latest 是一個為 ARM32 架構裝置製作的 Docker Watch now on Amazon Prime Video 映像檔 >> 您可以為您的自訂 Yii2 應用程式客製化 Docker 映像檔。
$ pvr app add yii2 --from=sirinibin/yii2-basic-arm32v7:latest

步驟 3:將變更部署到裝置 
$ pvr add . $ pvr commit $ pvr post 
步驟 4:檢查 Pantahub.com 儀表板中的裝置狀態變更,並等待狀態變成 "DONE" 
狀態 1

狀態 2

狀態 3

狀態 4

步驟 5:驗證 "yii2" 應用程式部署 
在您的網頁瀏覽器中存取裝置 IP:http://10.42.0.231/myapp1/web/。 
]]>您已完成!
Yii2 - 從 Bootstrap3 轉換到 Bootstrap4
撰寫本文的原因是,雖然轉換過程大致上是輕鬆無痛的,但仍有一些小問題。這些問題不難解決,但問題的根源並不明顯。
1 - 安裝 Bootstrap4。我的偏好是直接使用 Composer。變更專案根目錄中的 composer.json
- 找到包含 Bootstrap3 的行。
複製該行,並變更新行
- 將 bootstrap 變更為 bootstrap4
- 現在前往 https://github.com/yiisoft/ - Github 上的 Yii2 儲存庫
- 搜尋 bootstrap,找到 Bootstrap 4 儲存庫,並查看目前的版本。截至 2020 年 1 月,https://github.com/yiisoft/yii2-bootstrap4 顯示目前的版本為 2.0.8
- 將版本字串變更為該版本號碼,並將 ~ 也變更為 ^
- 在此之後,您應該會得到如下所示的內容,版本號碼可能會更高
"yiisoft/yii2-bootstrap" : "~2.0.6", "yiisoft/yii2-bootstrap4" : "^2.0.8",
- 儲存檔案,然後執行 'composer update'
- 使用您的 IDE、文字編輯器或您擁有的任何其他方式,找到所有使用 bootstrap 的地方,並將其變更為 bootstrap4。我的建議是搜尋字串
yii\bootstrap\並將其變更為yii\bootstrap4\。但是,請小心 - 您的 IDE 可能需要逸出反斜線。例如,Eclipse 可以輕鬆找到所有包含該字串的檔案,但搜尋字串必須使用雙反斜線,而替換字串必須保留為單反斜線。 - 現在執行所有測試並修正出現的問題。大多數失敗將來自於 Navbar 不再運作的事實,很可能是這樣。它仍然在那裡,只是呈現方式不同,在我的情況下它是不可見的。這是因為 Bootstrap4 變更了 navbar 的某些元素。在我的情況下,14 個測試失敗 - 其中許多失敗是由於以某種方式使用了 navbar 內容,例如尋找登入連結以推斷使用者是否已登入。
- 如果您不了解這些問題,您將無法解決這些問題,因此請查看 https://bootstrap.dev.org.tw/docs/4.0/migration/。特別是,查看 Navbars 方面的變更。最有意義的是 Bootstrap4 不再指定背景,而 Bootstrap3 則指定了。
- 在您的編輯器中開啟 frontend/viewslayouts/main.php,然後在瀏覽器中查看您的網站。在我的情況下,除了品牌之外,沒有 navbar,那是因為我將其從作為 Yii2 範本一部分交付的內容變更了,並且它包含背景。由於其餘部分是標準的,因此沒有其他內容 - 沒有緞帶條,也沒有選單項目,儘管將滑鼠移到該區域會顯示連結在那裡並且可以點擊。
- 找到以
NavBar::begin開頭的行,並查看其 class 選項。在我的情況下,它們是原始的:'class' => 'navbar-inverse navbar-fixed-top'- 正如我之前所說,不包含背景,因此新增一個:bg-dark - 並再次檢查。現在緞帶又回來了,但沒有選單項目。
- 在緞帶上按一下滑鼠右鍵並選擇「檢查元素」,或在您的瀏覽器中執行任何您必須執行的操作以檢查頁面原始碼。查看該原始碼開始為您提供有關 navbar 正在執行的操作的線索。查看該原始碼並參考 Bootstrap4 遷移指南,我的印象是 navbar-inverse 和 navbar-fixed-top 都沒有執行任何操作。所以我移除了這些,並且在重新整理頁面時,確認沒有任何變更。
- 在 Bootstrap 網站上閱讀更多內容,我得到了我之前提到的 bg-dark,對於文字,navbar-light 或 navbar-dark 產生了結果。
- 現在我沒有選單項目,但我有一個按鈕可以展開選單。檢查其屬性告訴我它是 'navbar-toggler',而 Bootstrap 網站告訴我它是 Bootstrap4 的新增功能,雖然預設情況下它是摺疊的,但 'navbar-expand' 會預設展開它。這很酷 - 我認為我將為登入使用者新增一個設定,讓他們選擇他們喜歡哪一個。最後,我選擇了 navbar-expand-md,它使其保持展開狀態,除非螢幕寬度很窄。
- 找到以
在所有這些結束時,我將 class 行變更為類似於原始 navbar 的內容
        //Bootstrap3: 'class' => 'navbar-inverse navbar-fixed-top',
        //Changed for Bootstrap4:
        'class' => 'navbar navbar-expand-md navbar-light bg-dark',
麵包屑導航
注意 - 2020 年 3 月:麵包屑導航的整個章節可能不再是問題。雖然我保留了該章節作為教學,但在進行任何變更之前,請先閱讀 Davide 在使用者評論中的說法。
因此,這修正了我的 navbar。接下來,我注意到麵包屑導航不太正確 - 分隔路徑元素的斜線不再存在。為了準備進行大量偵錯,我前往 Bootstrap 網站尋找一些靈感。我不需要再尋找了 - Bootstrap 4 要求每個麵包屑導航元素都具有 "breadcrumb-item" 類別。在我花了一些時間查看 vendors/yiisoft/yii2/widgets/Breadcrumbs.php 以了解問題之後,我發現所有需要做的就是變更 itemTemplate 和 activeItemTemplate。當然,由於這些是 Yii2 框架的一部分,您不想變更該檔案,否則,它可能會在某個階段更新,並且您的所有變更都會遺失。由於這兩個屬性都是公開的,您可以從類別外部變更它們,而最簡單的方法是在 frontend/views/main.php 中執行此操作: `html
<div class="container">
    <?= Breadcrumbs::widget([
        'itemTemplate' => "\n\t<li class=\"breadcrumb-item\"><i>{link}</i></li>\n", // template for all links
        'activeItemTemplate' => "\t<li class=\"breadcrumb-item active\">{link}</li>\n", // template for the active link
        'links' => isset($this->params['breadcrumbs']) ? $this->params['breadcrumbs'] : [],
    ]) ?>
    <?= Alert::widget() ?>
    <?= $content ?>
</div>```
資料網格 ActionColumn 我的一個頁面是一個由 gii 為我產生的資料網格。在每一列上,它都有一組按鈕,您可以點擊這些按鈕來檢視、編輯或刪除該列。在 Bootstrap 4 下,ActionColumn 消失了。檢視頁面原始碼顯示它在那裡,但我看不到它也無法點擊它。前往遷移指南,結果證明 Bootstrap 3 包含圖示,但 Bootstrap 4 不包含。我從 Yii2forum 中提出的問題 中獲得了很多幫助。最後,我的解決方案是透過在 composer.json 的 require 區段中包含行 "fortawesome/font-awesome": "^5.12.1" 來取得 FontAwesome 5 的本機副本,然後選擇我想要的圖示。我花了很多時間弄清楚如何做到這一點,但是當我完成時,它似乎幾乎是反高潮的簡單。這是我在資料表單中所做的
            ['class' => 'yii\grid\ActionColumn',
                'buttons' => [
                    'update' =>  function($url,$model) {
                        return Html::a('<i class="fas fa-edit"></i>', $url, [
                            'title' => Yii::t('app', 'update')
                        ]);
                    },
                    'view' =>  function($url,$model) {
                        return Html::a('<i class="fas fa-eye"></i>', $url, [
                            'title' => Yii::t('app', 'view')
                        ]);
                    },
                    'delete' => function($url,$model) {
                        return Html::a('<i class="fas fa-trash"></i>', $url, [
                            'title' => Yii::t('app', 'delete')
                        ]);
                    }
                 ]
            ],
功能測試
至少在視覺上沒有看到任何更多的東西,至少沒有明顯的東西,我現在執行了測試套件。這些測試之前都通過了,但現在其中幾個失敗了。其中一個是聯絡表單,所以我單獨執行了該表單,測試告知我它們失敗的原因是它們看不到錯誤訊息
1) ContactCest: Check contact submit no data
 Test  ../frontend/tests/functional/ContactCest.php:checkContactSubmitNoData

 Step  See "Name cannot be blank",".help-block"

 Fail  Element located either by name, CSS or XPath element with '.help-block' was not found.
另一方面,我可以在表單上看到錯誤訊息,所以我使用了瀏覽器的頁面原始碼,發現 css 類別不再是 "help-block",它已變更為 "invalid-feedback"。很簡單 - 在 frontend/tests/_support/FunctionalTester.php 中,我變更了預期的 css 類別
public function seeValidationError($message)
{
    $this->see($message, '.invalid-feedback');
}
當然,這個小摘錄只是一個範例。我發現同樣的事情必須在多個位置完成,但所有位置都很容易找到和解決。
在此之後,執行我的測試沒有指出其他問題,但我不希望這意味著沒有任何其他問題。雖然到目前為止一切似乎都運作正常,但我預計在底層還有更多問題隱藏著。不知何故,這些問題似乎不再那麼難以克服了。
]]>